
If you’re not already aware we have been hard at work on My Summer Cottage, our cozy cottage life simulator. As we approach the end of 2025, we wanted to share some exciting updates and insights into what we’ve been working on and what you can expect in the coming months.
We are hard at work putting together a demo for My Summer Cottage. Our current goal is to have a playable demo ready by early 2026. We will initially release the demo on s&box. This will allow us to gain player feedback and make the necessary adjustments before we put the demo on Steam. We are awful with deadlines, but our goal is to have it ready by Q1 2026.
We haven’t been posting as much on social media as we are focusing on development, but we will be ramping up our social media presence as we get closer to the demo release.
The concept for My Summer Cottage was developed by ceitine in early 2023. It was planned to be a horror game originally. The idea was put on hold until the first s&box Facepunch gamejam in early 2024.
We won first place in that jam and our initial prototype for My Summer Cottage was created. It evolved quite a lot compared to the original concept. We like to think of it as a theme park and a mashup of games like My Summer Car, Stardew Valley, and Postal (by the way, we would like to thank the creator of My Summer Car for allowing us to use the name My Summer Cottage).
We took a bit of a break after the jam and worked on other projects. By early 2025 ceitine and I began rewriting the codebase from scratch. The original jam prototype was built in a hurry and was not designed to be expanded upon. The rewrite has allowed us to build a solid foundation for the game and implement features that were not possible in the original prototype.
Other members joined in and we have surpassed the original prototype in terms of features and content. We have a solid vision for the game and have built a strong foundation to bring that vision to life. Here’s a sneak peek of some of the things we have been working on.
One of the major complaints we had with the original prototype is players didn’t even know where their cottage was. This is a bit hilarious considering the name of the game is My Summer Cottage. We wanted to make sure that players could easily identify their cottage and have a sense of ownership over it.
You’ll be given a cottage at the start of the game, and you’ll be able to customize and expand it as you progress through the game. We’ve implemented a building system that allows players to place furniture, decorations, and other items in their cottage.
Vehicles were something that we needed to get right for My Summer Cottage. We have plans for multiple types of vehicles in the game so we needed a solid system that could handle different vehicle types and behaviors.
I initially started my implementation by watching this great video. One thing that caught me by surprise was how easy it was to build a suspension system. From there on out we expanded upon it with the help of ceitine. We were however not satisfied with the limited options we had for controlling how the vehicles handled. We obviously could have added more parameters ourselves, but I opted for looking for a more robust solution.
The ArcadeCarPhysics repository has a fantastic base implementation for vehicle physics. Since Unity and s&box have fairly similar APIs, it was fairly straightforward to port the code over. I ended up open sourcing my port of the code which you can find on GitHub.
Now, we obviously kept tweaking it to fit our needs, yart actually did some additional work to improve the way we handle wheel traction. We ended up with a solid vehicle system that allows us to create different vehicle types with ease. Our bicycle, for example, uses the exact same vehicle system as our cars, but obviously with different parameters.
All we needed was our initial vehicle model, which ended up being created by PUKES. The choice of car was obvious, as we are a game based in the fictional land of Finland during the early 2000s.
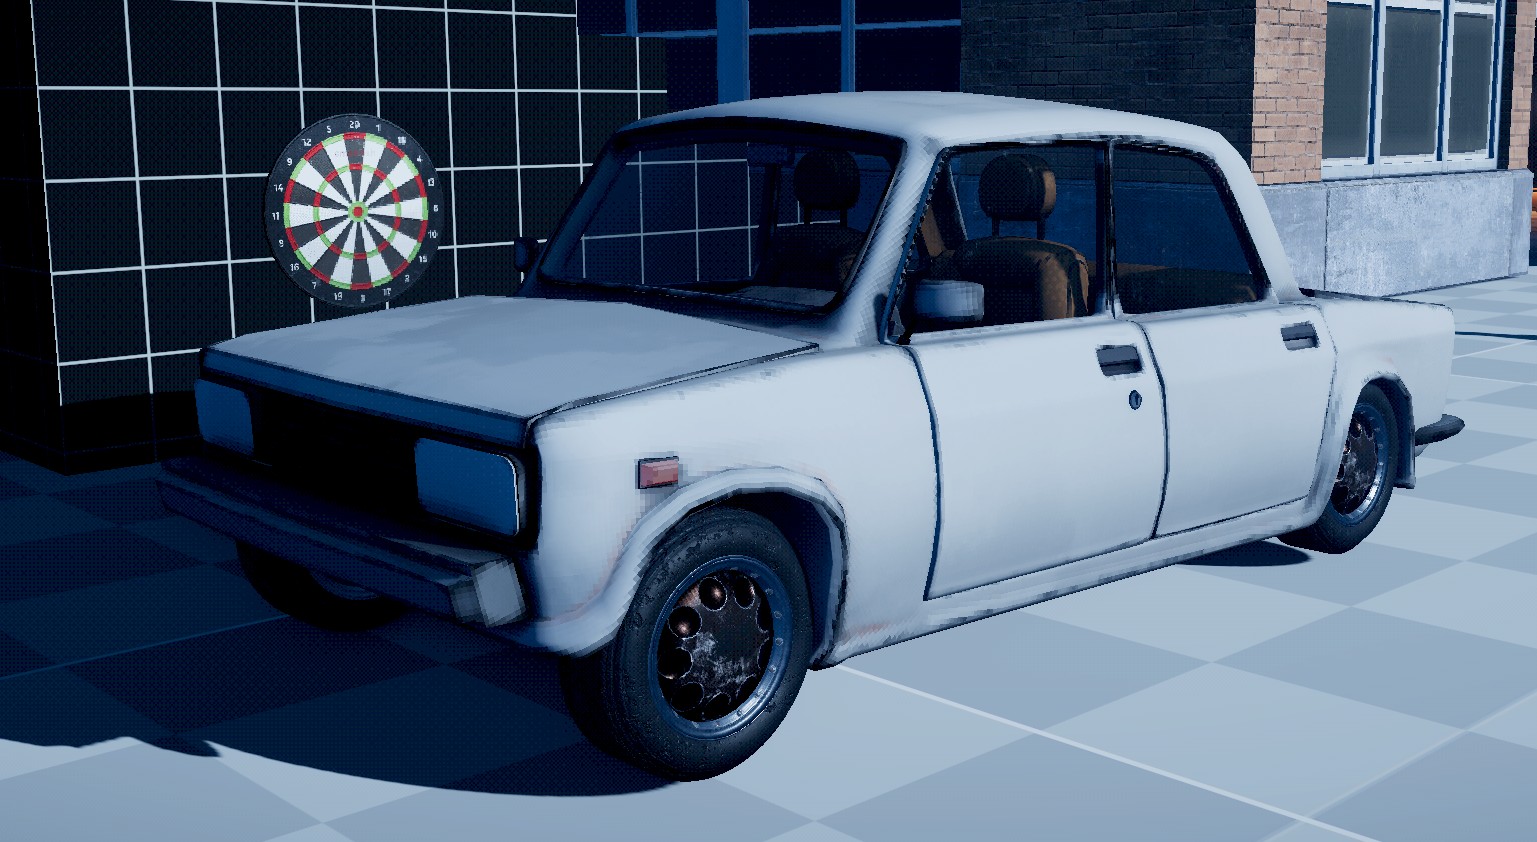
Lada Riva
During the game jam, we decided against using Game Resources for items because we could just define the data inside the component itself. However, this time around I took an approach of using resources for almost every data-driven aspect in the game, and it has worked out really well. Here’s some examples of how Items benefit from using resources:
- All resources already have an accessible unique identifier, this means we can network and serialize them with ease.
- You have access to the data in a resource without needing to instantiate the object, this is great for a multitude of reasons.
- You can use them in UI elements with ease.
- If you needed to search for an item in a players inventory, the unique identifier can be used.
- You can grab resources in directly into ActionGraph and use them directly.
- You can create custom editors for resources, making it easy to manage and edit data.
- Resources hot reload automatically when you make changes to them.
I wrote a nice tool that helps us create new items quickly. You can right click in the asset browser and create a new item. This will create the item resource alongside a default prefab which links to the resource.
There are probably other benefits that I haven’t mentioned, but, it all stems from the fact that you don’t have to instantiate an object to access its data, and you always have access to the resources (i.e by using ResourceLibrary.Get<T>(...)).
(Technically, you now can also fetch data from components without instantiating them, but it’s not as straightforward as using resources)
Save System
by matek
We really didn’t have a save system during our game jam prototype. The most we ever did was having each component handle saving and loading itself. This worked fine for the game jam, but scales poorly as the game gets more complex.
I ended up implementing saving and loading by allowing components to implement a ISave interface.
public interface ISave
{
	public string Identifier { get; }

	void OnSave( SaveWriter writer, SaveType type );
	void OnLoad( SaveReader reader, SaveType type );
}
The component just simply needs to implement this interface and that’s it. We have a SaveManager singleton that handles fetching every single ISave component in the scene and calls their respective OnSave and OnLoad methods. The SaveWriter and SaveReader classes provide a simple API for writing and reading data. The SaveType enum allows us to differentiate between saving the world or just the player data. We need this because if another player joins the game, we only want to load and save their player data. That way they can progress their character and return to their own cottage with their progress intact.
The save system uses binary serialization (reduces file size) but also supports delta saving. This means we only write data that has changed since the last save. Hopefully this will help reduce save times as the game gets more complex.
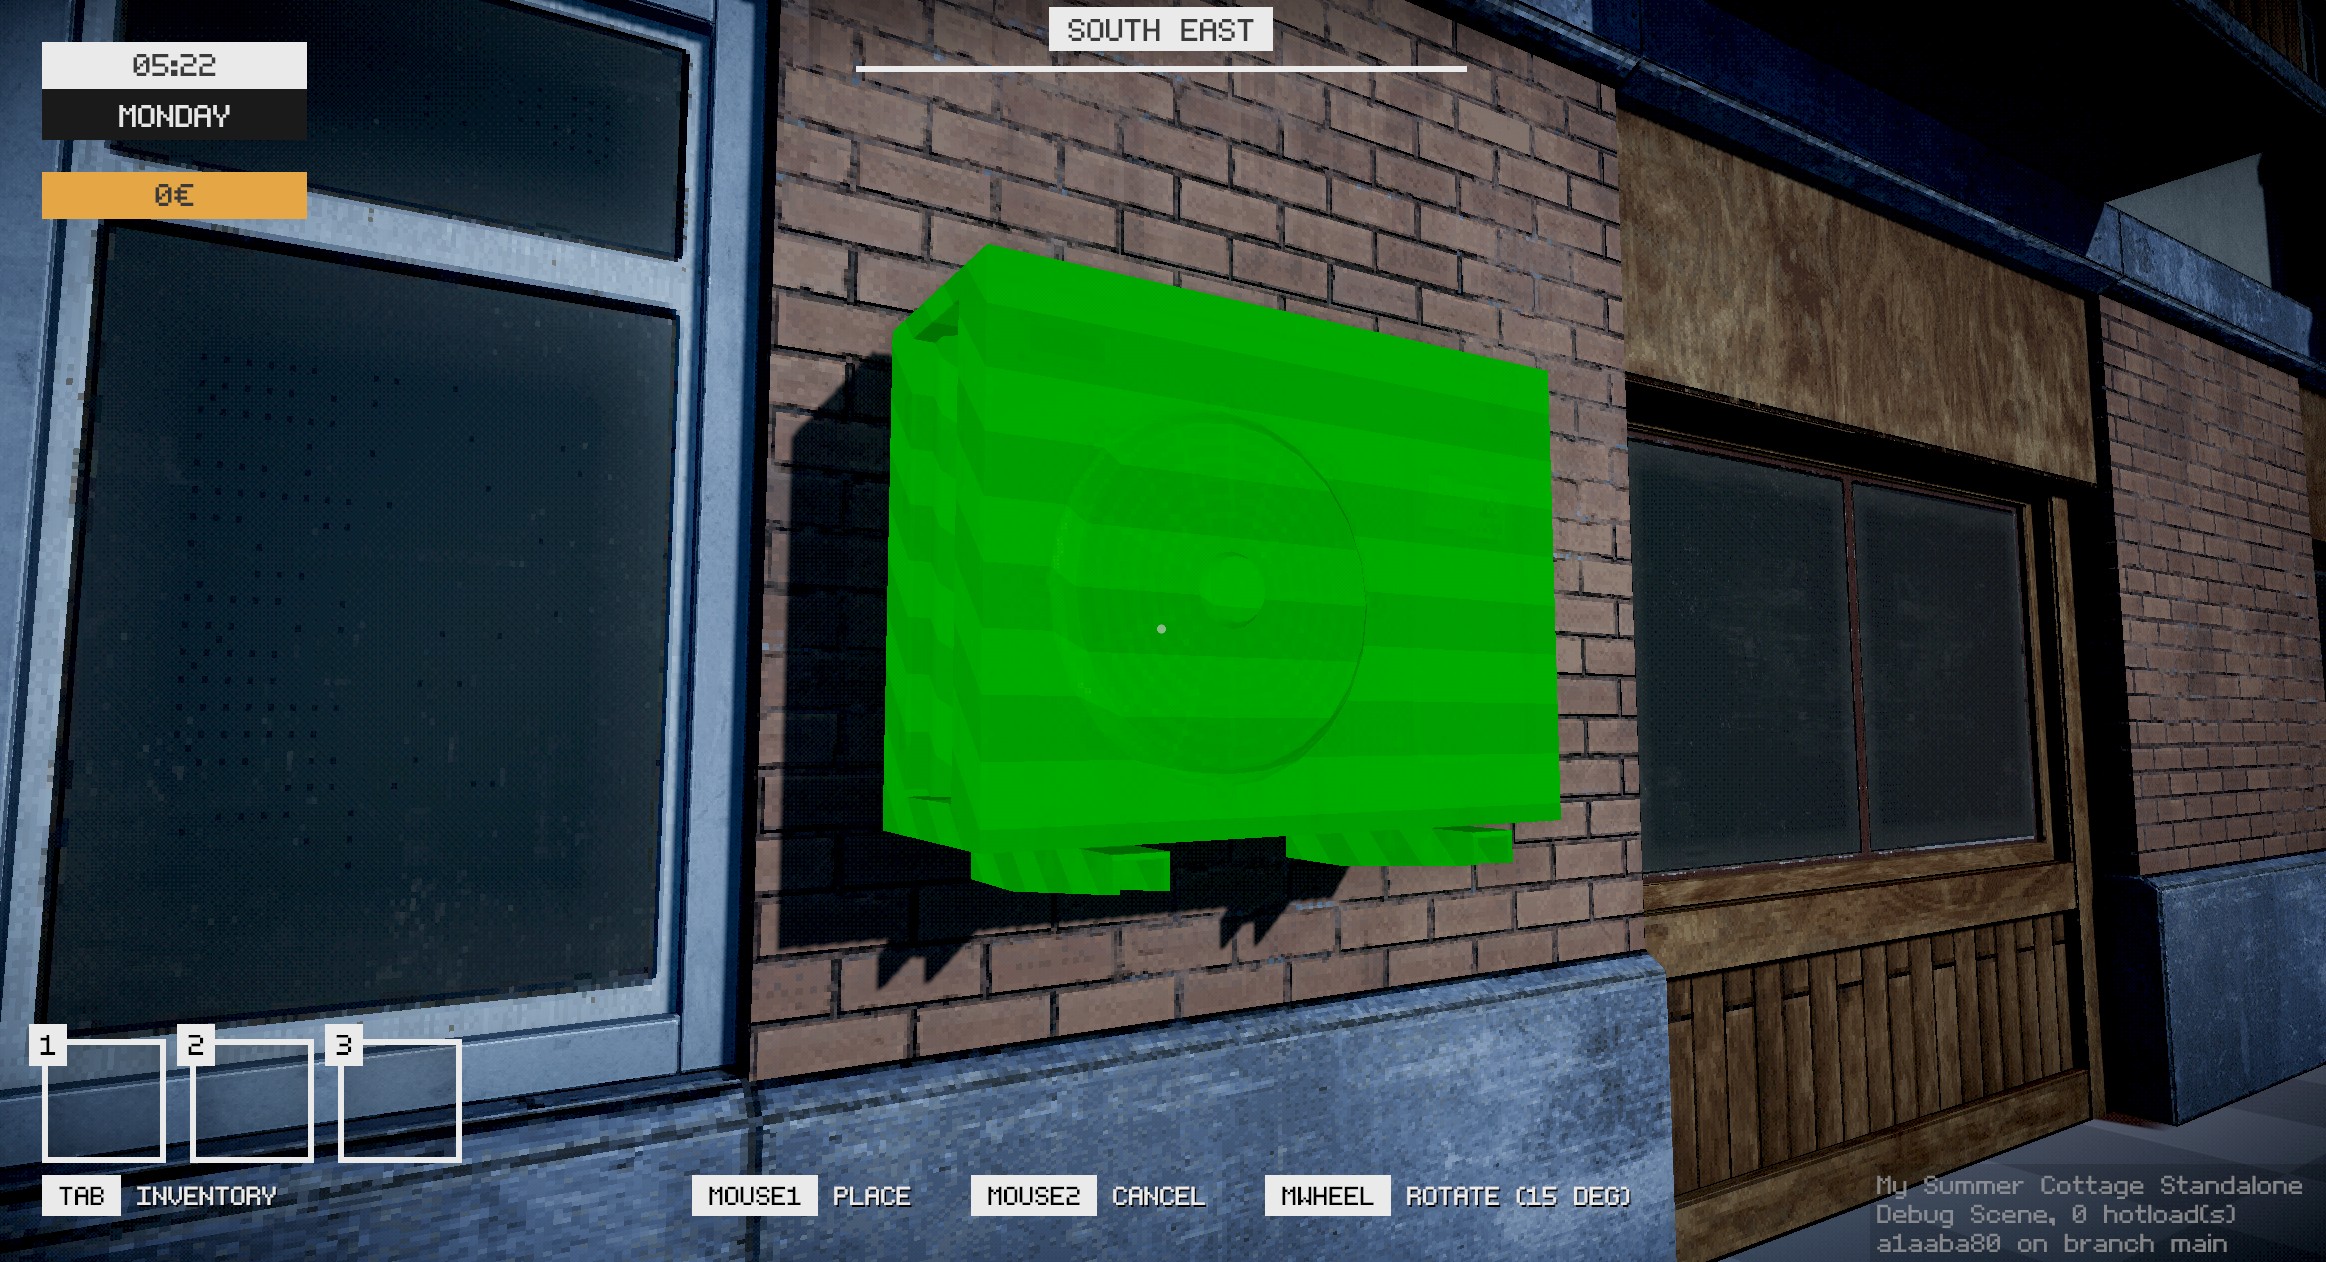
We had an initial interaction system during the game jam, but there was some limitations I wanted to address this time around. Essentially, you can think of an interaction as any action that a player can perform on an object in the world. This can be anything from picking up an item, opening a door, drinking a beverage, or even dropping an item from your inventory.
An Interactable component can have many interactions. Below, you can see an example of how an interaction can be defined.
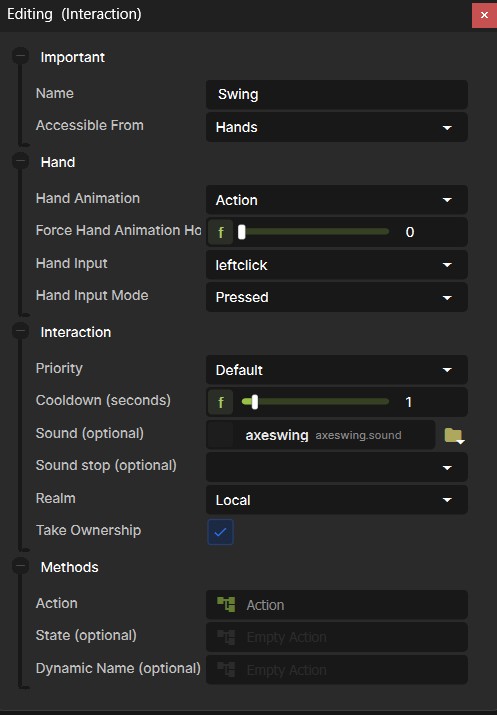
The biggest takeaway here is that an interaction has an extremely extensible interface that allows us to define custom behaviour for each interaction.
The newest additions this time around is the ability to define in what “realm” the interaction occurs. This means that we can execute an interaction on the host, local client, or all clients. Another addition (not shown in the screenshot) is the ability to define an interaction as a “charge”. This is great for things like drinking a beverage, where you want the player to hold down the interaction key to drink, and release it when they want to stop drinking.
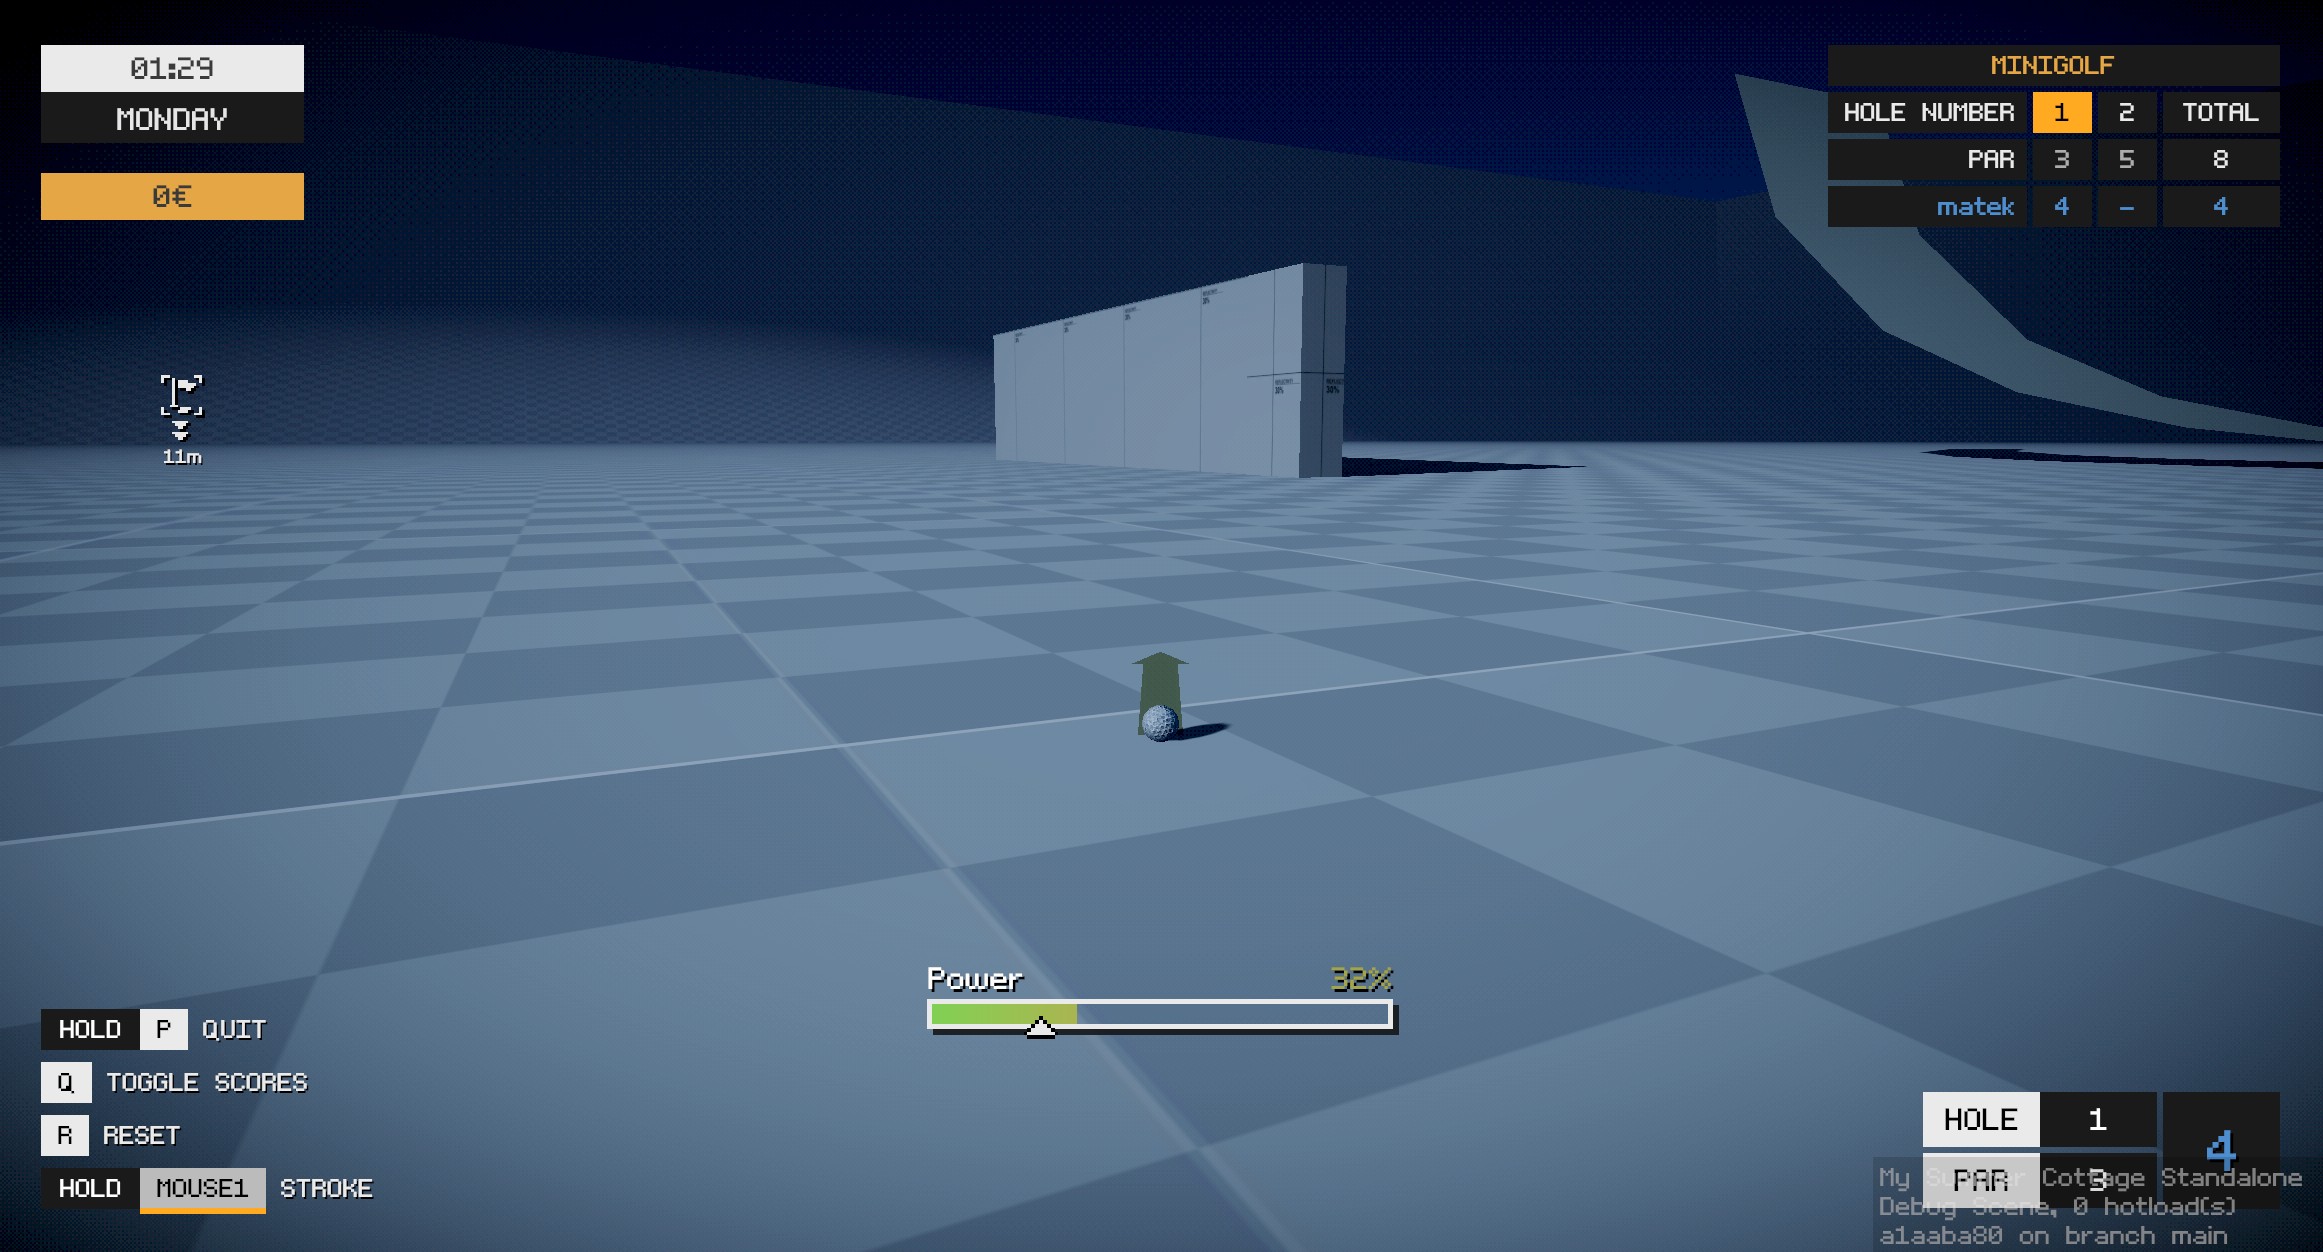
A couple years ago I worked on a minigolf game for s&box mostly developed by some folks over at Facepunch. I decided to write a minigolf implementation for My Summer Cottage as one of the side activities. You’ll be able to play through a course with your friends! Here’s a quick debug screenshot…
Jobs
by matek and wheatleymf
The questing system for My Summer Cottage is referred to as “Jobs”. These are tasks that the player can complete to earn money, experience, or to progress through the story. The system is now more robust and allows us to create more complex jobs with ease.
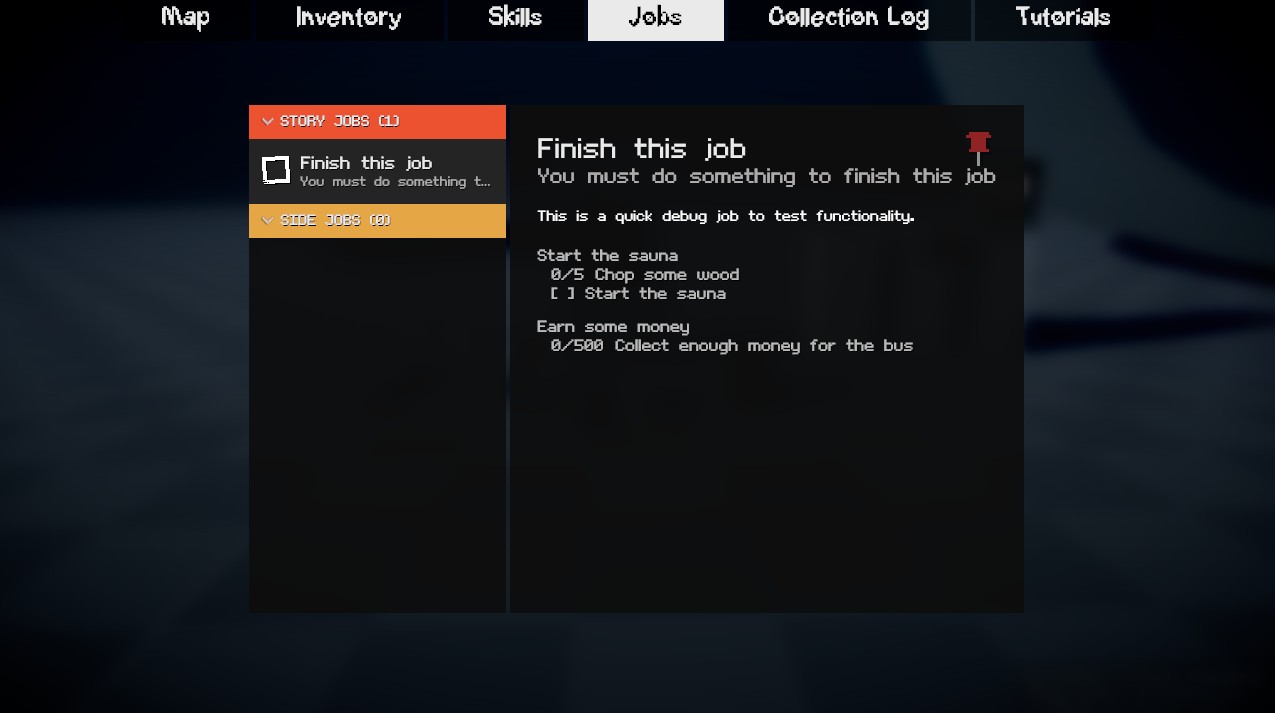
Here is a quick debug screenshot of the job system in action. Essentially, you can define multiple sub-tasks for each job. Each sub-task can have its own set of conditions that need to be met before it can be completed. These conditions range from a simple boolean check, meeting a specific number value, or even a signal that can be invoked from anywhere in the codebase.
Collection Log
by matek and wheatleymf
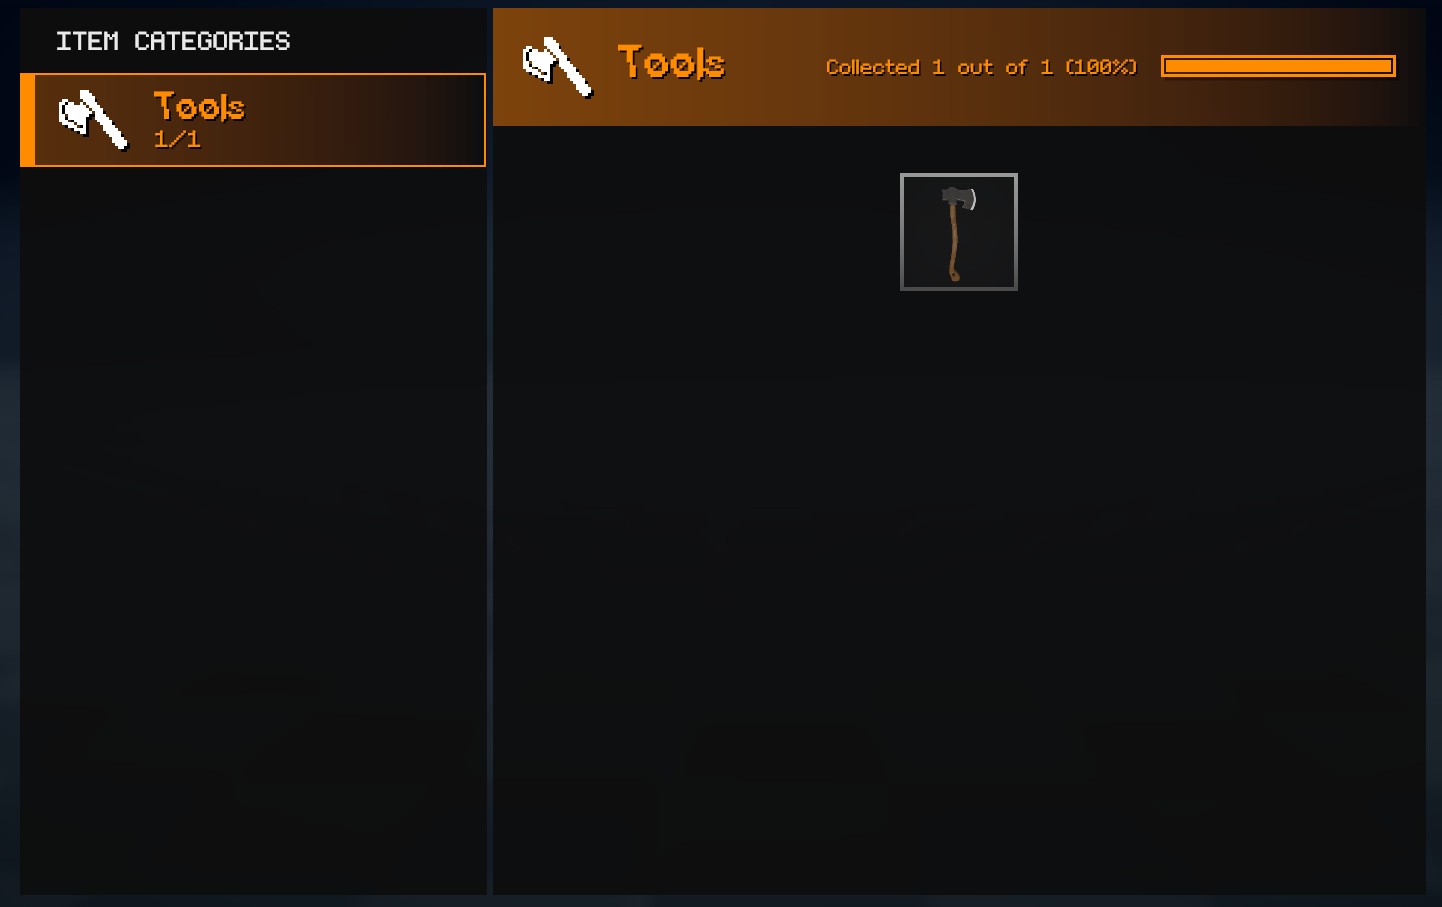
In the original game jam prototype, we had the concept of a “Fish Log” where players could track the fish they caught. This time around, we have expanded upon that idea and created a “Collection Log” which tracks specific categories of items. For example, we obviously have a fish category, but we also have a bug category, etc. We hope to have some nice rewards for completing the collection log.
One of the features that didn’t really pan out in our game jam prototype was the event system. The way it worked is we created a bunch of potential events that could occur in the world (i.e RC car invasion, UFO sightings, etc). We would select which events would occur at the start of the day. This ended up being a bit lackluster as players would often miss out on events because they were not in the right place at the right time.
I’ve proposed a new design philosophy for events. Firstly, we should try to avoid random events completely. There isn’t any reason why we should lock meaningful content behind randomness. Instead, we should focus on converting any detailed events into jobs that the player can actively seek out and complete.
A perfect example of this is the Nigerian Prince event from the game jam prototype. This should have just been a job that the player received one day on their phone. The player would then be guided to the parking lot to meet the Nigerian Prince in person.
There is still room to have events, but, they should have triggers that the player can actively seek out. For example, a player visiting X location at a specific time could trigger an event.
Now in terms of implementation, I have a SaunaEvent that has the following properties…
public SaunaEventType Type { get; set; }
public bool Repeatable { get; set; }
public int TriggerTimesForEvent { get; set; } = 1;
public SaunaEventRealm InvokeRealm { get; set; }
public Action InvokeEvent { get; set; }

public List<Trigger> Triggers { get; set; } = [];
Similar to interactions I’ve given the ability to choose which “realm” the event should be invoked in.
Now, the interesting part here is the Triggers list. Essentially, you can define your own custom triggers that determine when the event should be invoked. A trigger could be anything from the player entering a specific area, to the player interacting with a specific object.
Here’s an example of a trigger that invokes an event at a specific time of day…
namespace MSC;

public class TimeTrigger : Trigger
{
	[Property, Range( 0, 24 ), Step( 1 )] public int Hour { get; set; }
	[Property, Range( 0, 60 ), Step( 1 )] public int Minute { get; set; }

	protected override void OnStart()
	{
		if ( TimeManager.Instance.IsValid() )
			TimeManager.Instance.OnTimeChanged += OnTimeChanged;
	}

	private void OnTimeChanged( int newHour, int newMinute )
	{
		if ( newHour == Hour && newMinute == Minute )
			Invoke();
	}
}
Now there’s a lot more to the event system (such as being fully networked and saved), but this gives you a good idea of how it works. I hope this allows us to create some more interesting and engaging events for players to experience. We have the ideas, now it’s just a matter of implementing them.
Skills
by matek, ceitine, and wheatleymf
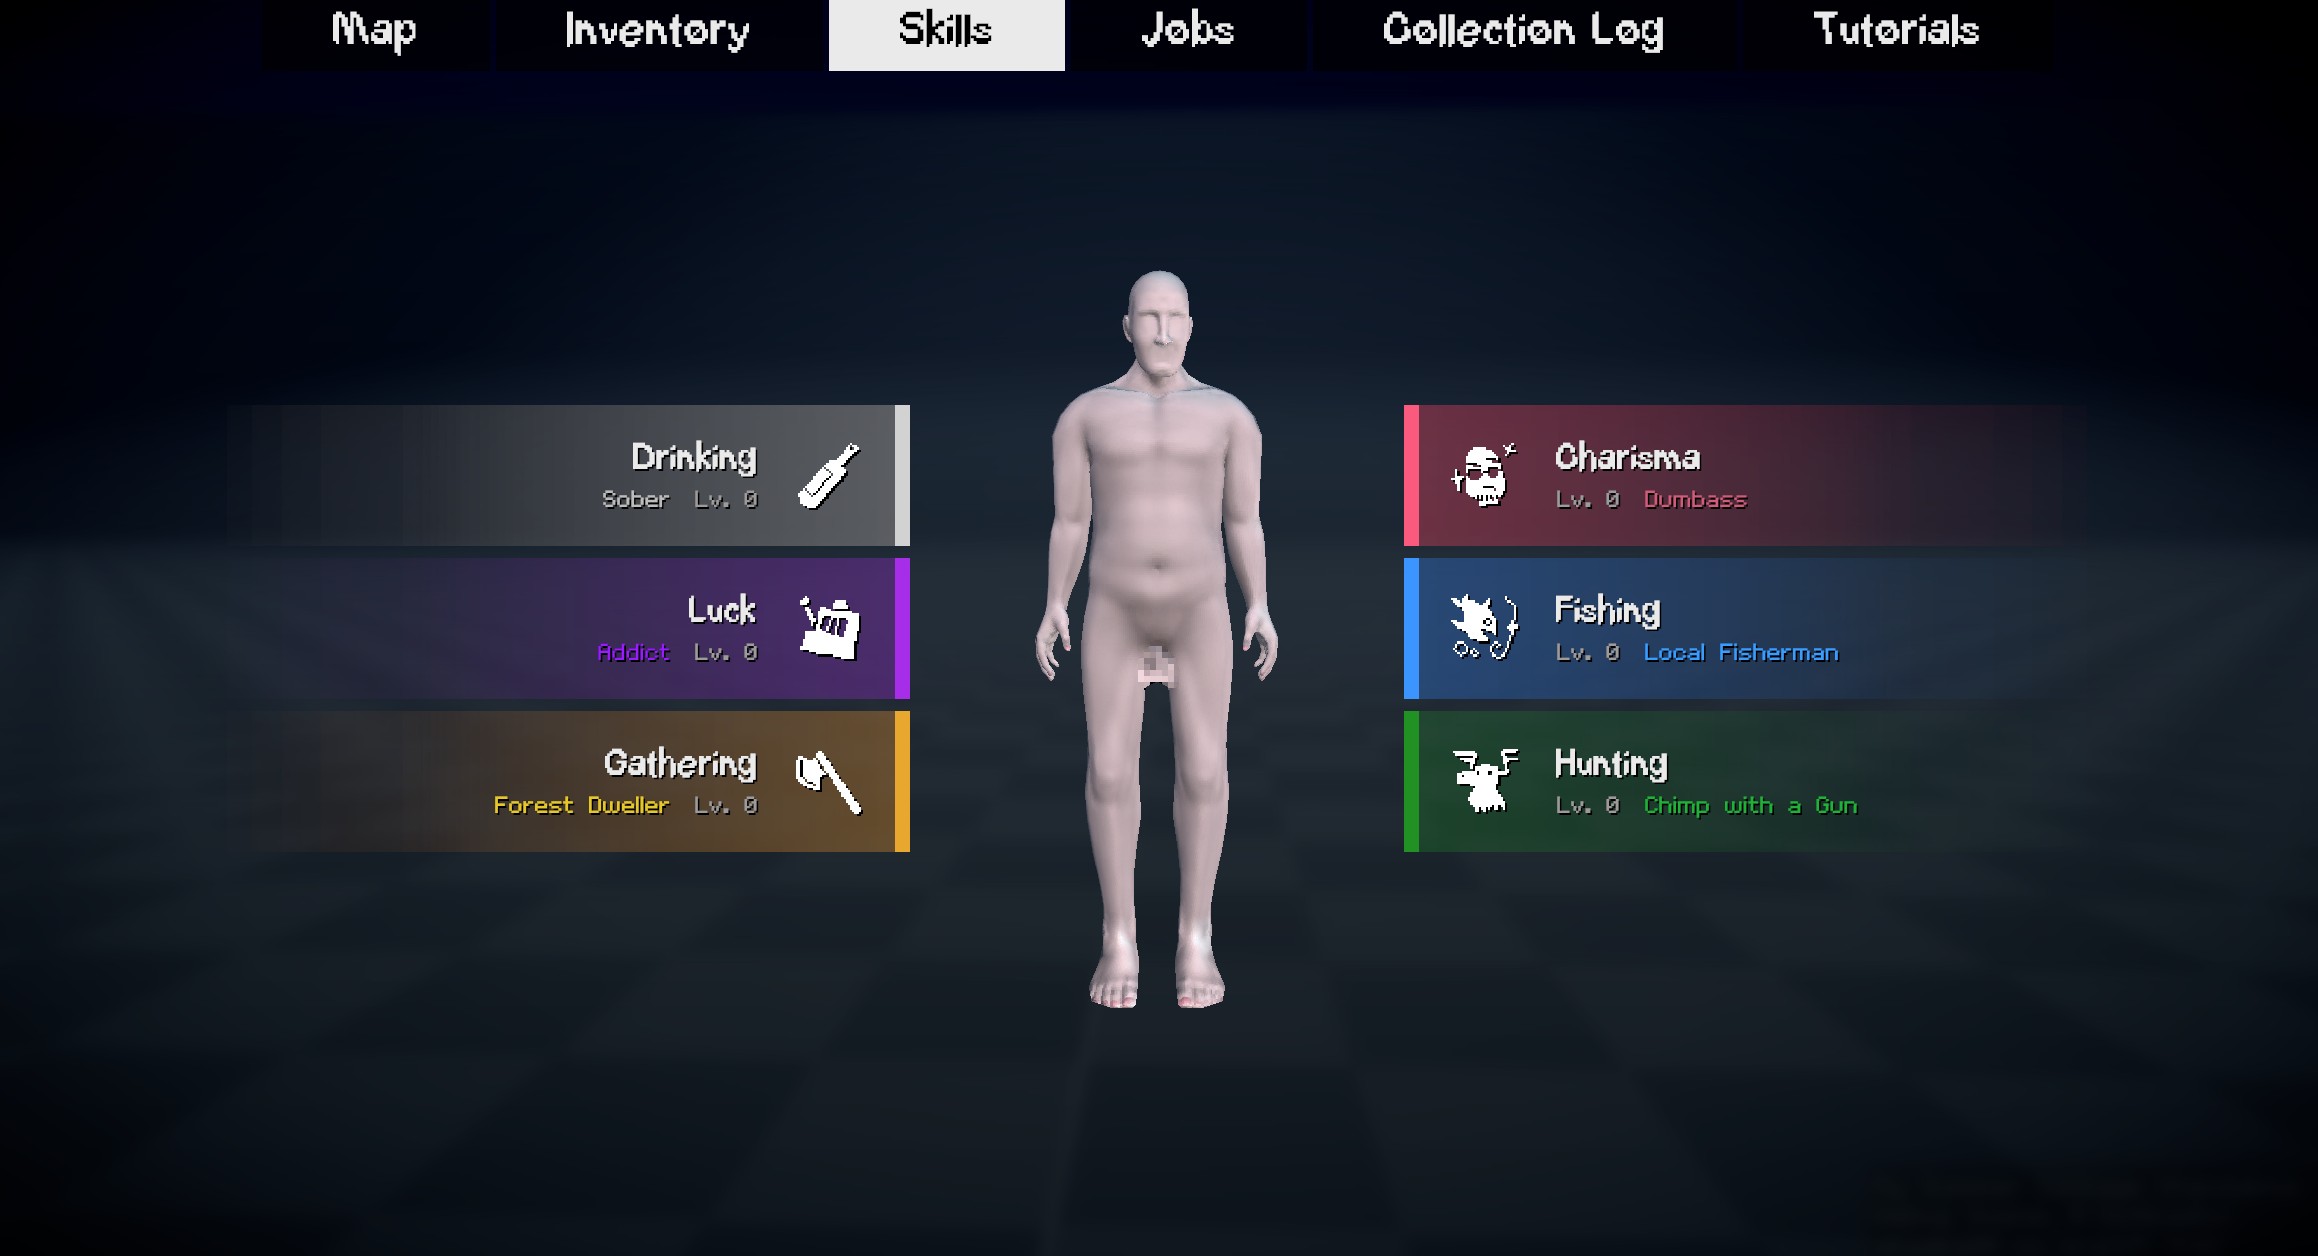
We have added a skill system to the game. Players can level up various skills such as fishing, drinking, hunting, and more. As players level up their skills, they unlock new perks and abilities that make them more efficient at their chosen activities. There won’t be any elaborate skill trees, but rather a simple progression system that rewards players for investing time into specific activities.
We decided to use the pawn library I wrote for handling the player possessing different entities in the game. This allows us to easily switch between controlling the player character and other entities such as golf balls, cameras, and more. I don’t have much else to say other than it’s a feature complete library and we’ve used it in Death Card and Blocks & Bullets.
Phone
by matek and wheatleymf
The phone is making a return and hopefully it’ll actually have some functionality this time around. The phone really serves as a method for NPCs to contact the player. It’ll be the primary method NPCs use to give the player jobs, tips, and other information.
We’ve also integrated text chat into the phone, so players can communicate with each other through it. We don’t expect many players to use it for communication (since most will be on voice chat), but it’s a fun feature to have nonetheless.

I’ve implemented a basic crop system for My Summer Cottage. Players will be able to plant, water, and harvest crops in their garden. Different crops will have different growth times and yield different rewards. We don’t know how deep we want to go with the farming aspect of the game, but it’s a nice little side activity for players to engage in.
We really suck at guiding our players through the game. It could be the case that we just deprioritize tutorials during game jams, but I really wanted to make sure that players knew what the fuck was going on this time around.
I’ve implemented tutorials that show up in-game and also within the user interface.

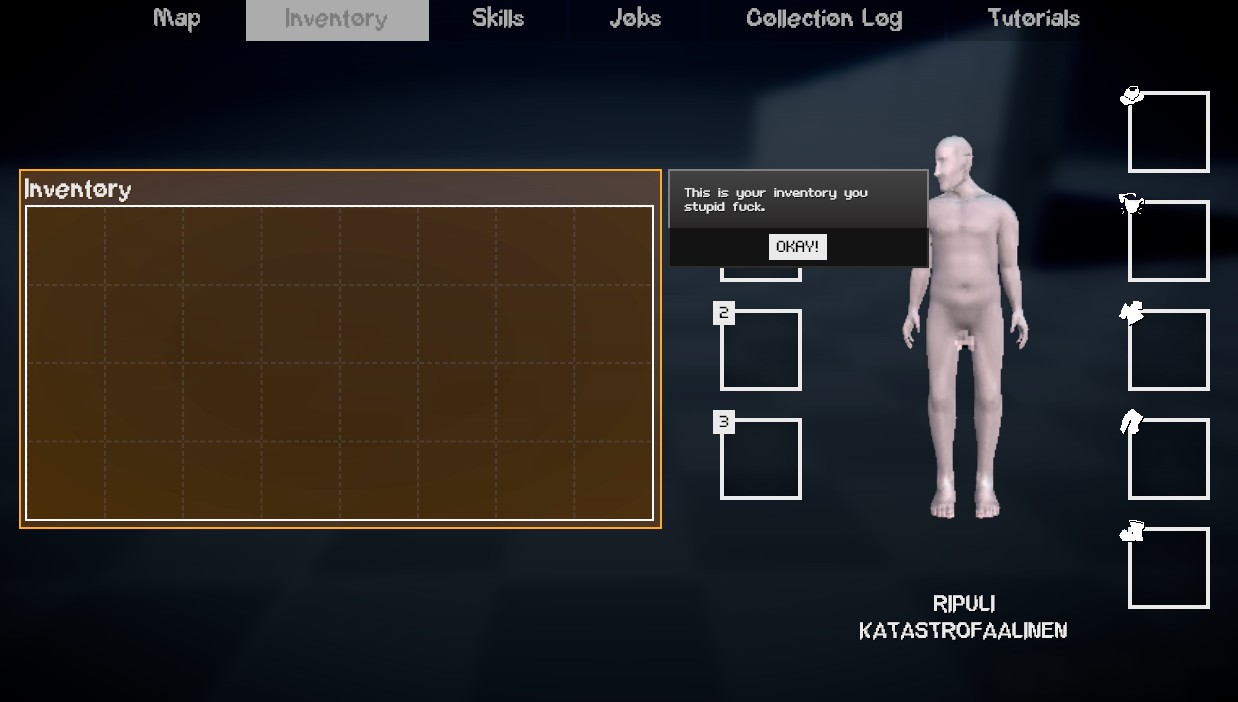
There’s even a location to view the tutorials afterwards in the tab menu.
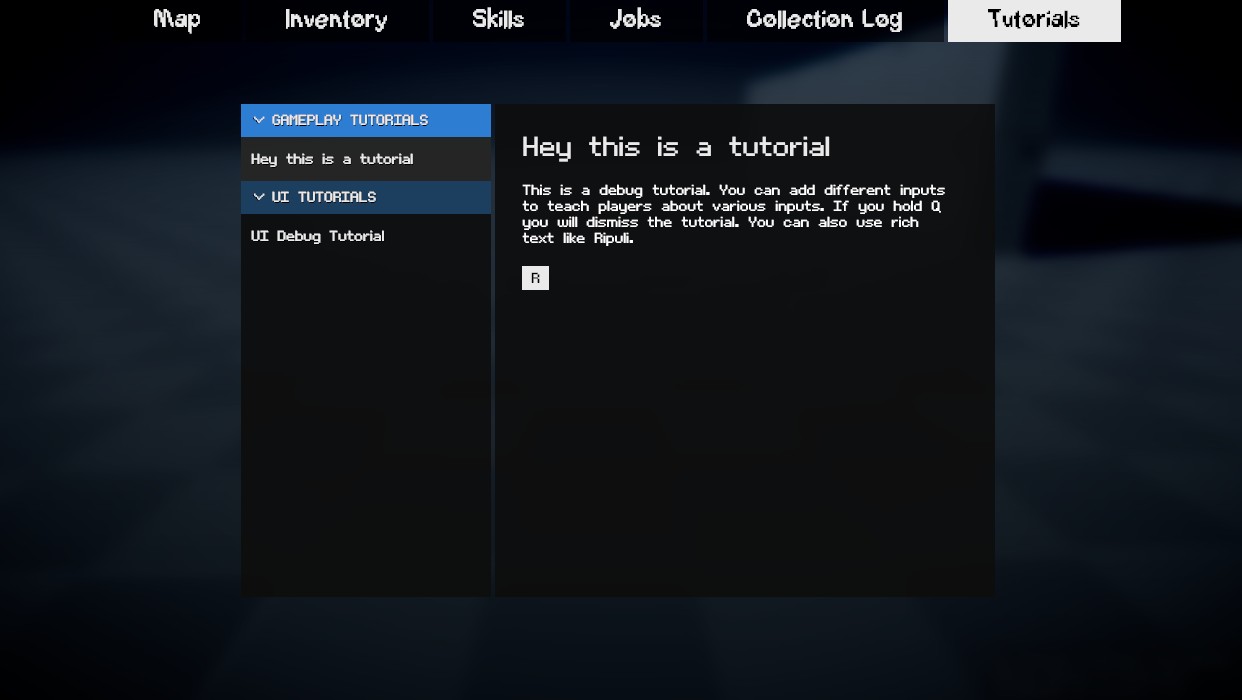
If we fail to explain the game this time around it’s on us.
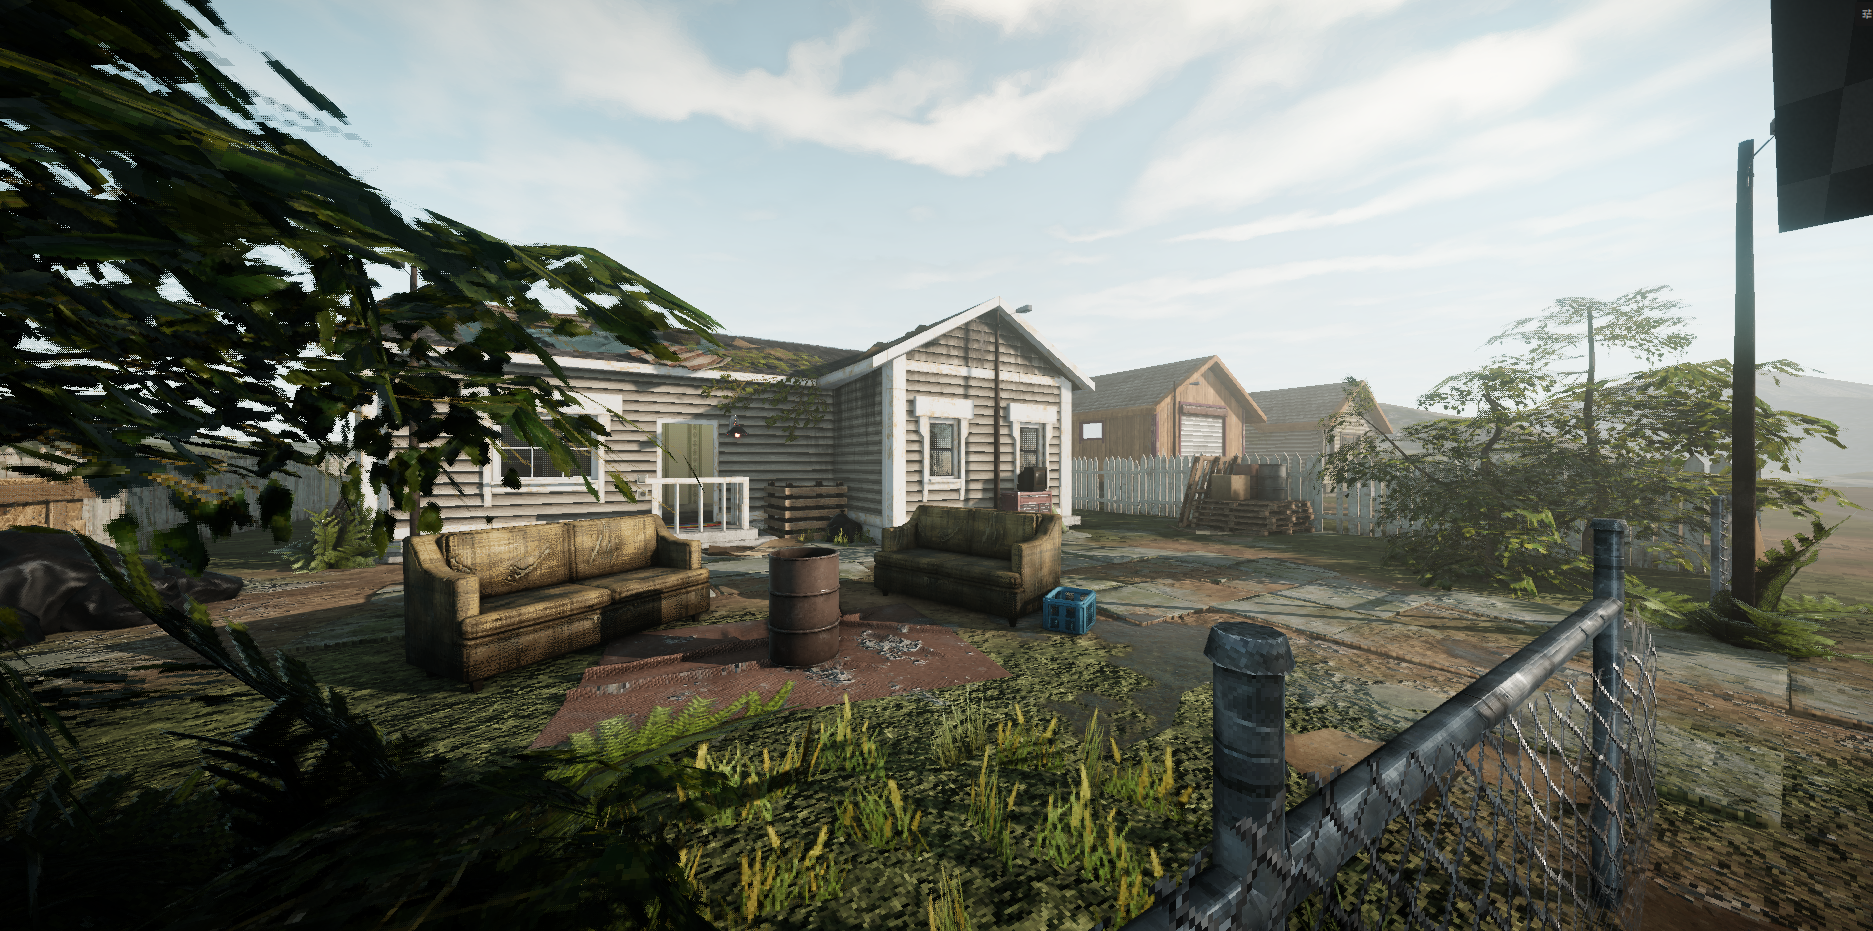
Honestly, it’s kind of difficult to speak about such huge subjects like a new map, because it’s something that I have been working for many, many months now, and there’s just too many things to cover for a single blogpost. As you probably know, we are reworking the entire map for the standalone game, that includes removing, or reworking map assets from the gamejam version. And there is a LOT of things happening right now.
Lets talk a little about reasons! Why? Our scope for the standalone version is much larger, we are hoping to deliver much more gameplay activities than in the original version. Existing things like hunting, foraging and fishing are also going to be more detailed. All of this stuff requires not only coding, but also more space for interactions. For fishing, you want different types of lakes and rivers, for hunting you want more nature areas for exploration and finding rare animals. For foraging, you also generally need more places to explore.
0: https://files.smallfi.sh/wheatleymf/36ee05d/hobo_alley.png
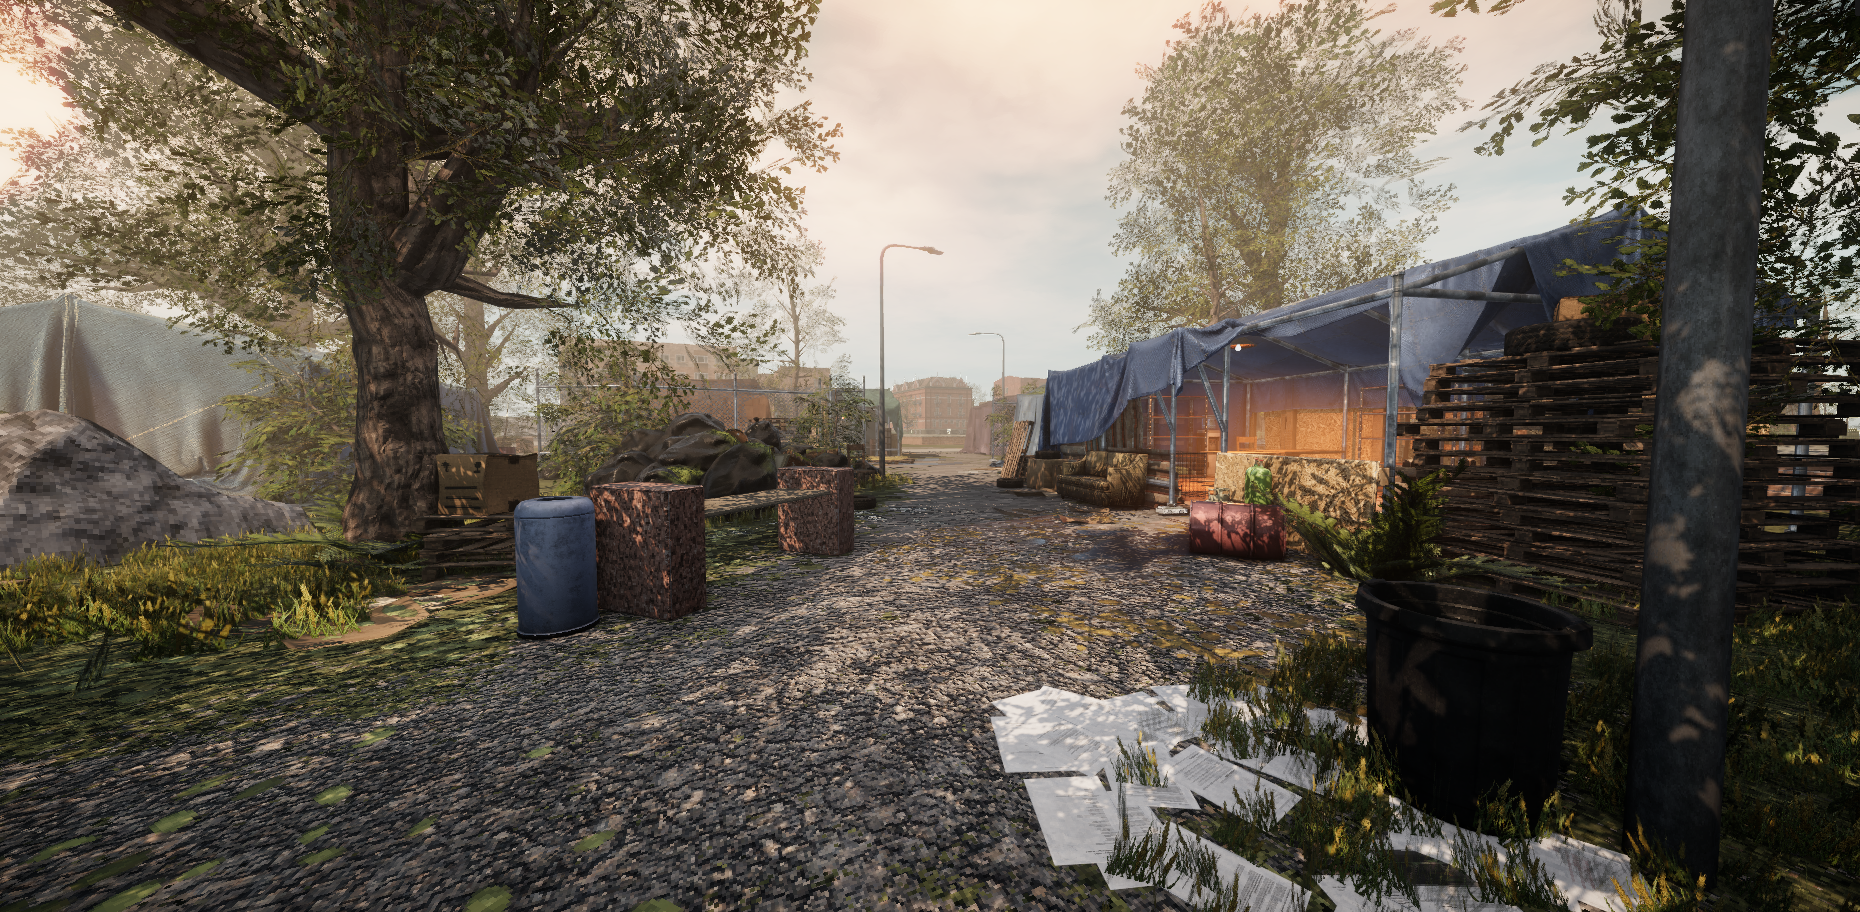
This rabbit hole goes really deep! For other activities like gambling or drinking, you need special locations like bar, or casino. For trading your fish or animal meat, you need specialized shops located somewhere on the map. For NPCs and other events, you need some kind of town.
Long story short, I have been working on a really damn large map. For the demo version, I am planning to finish only a specific fraction of the map, so I can keep a reasonable deadline for myself. I have spent many months creating hundreds of textures, and tons of props. And modelling & texturing new buildings, of course!
Speaking of progress… It’s hard to summarize it, because there were so many locations and assets involved, but one of the most difficult things is building a layout, and prototyping all props and buildings on the map. Let’s just say that all of this has been complete. Layout is almost done, and all locations have been prototyped - and I am currently actively working on finalizing all of the assets. This means that I do not intend adding any new content until demo is done, and all effort will be put into texturing and polishing existing assets, making required props for the environment, and new materials if necessary. :-)
One of the things that also took a lot of time this year were graphics. For several reasons, I decided to go with an entirely custom shading model for our game, which gave us slightly more control over materials, and overall visuals. I think our model is slightly simpler compared to the standard one, which is still PBR, but with a few silly simplifications in indirect lighting.In the final version I’d like to give players full control over the graphics. If they want to play with fancy visuals, they will have it. If they want to run SSAO and SSR, we will give them control over that. If they want to go with gimmick retro visuals, they will have it, too! Changing lighting quality, fog visuals, texture filtering and bit depth, pixelated shadows, dithering, wobbly vertices, I want you to make My Summer Cottage look exactly how you imagine it.
I can’t promise that you will have these features in the demo version though.
Other fun thing that I added to our shading model is subsurface scattering. It is a very simple implementation and there’s novel about it, it is probably far from accurate, but it is cheap and works pretty well for our needs. It uses thickness map (can be baked in Marmoset Toolbag, and probably Substance Painter too?) and worldspace normals to affect how much light passes through thin surfaces. I am also using it for the human skin and foliage.
Here’s a short video showing off some features:
…and here’s a video where I was testing subsurface scattering:
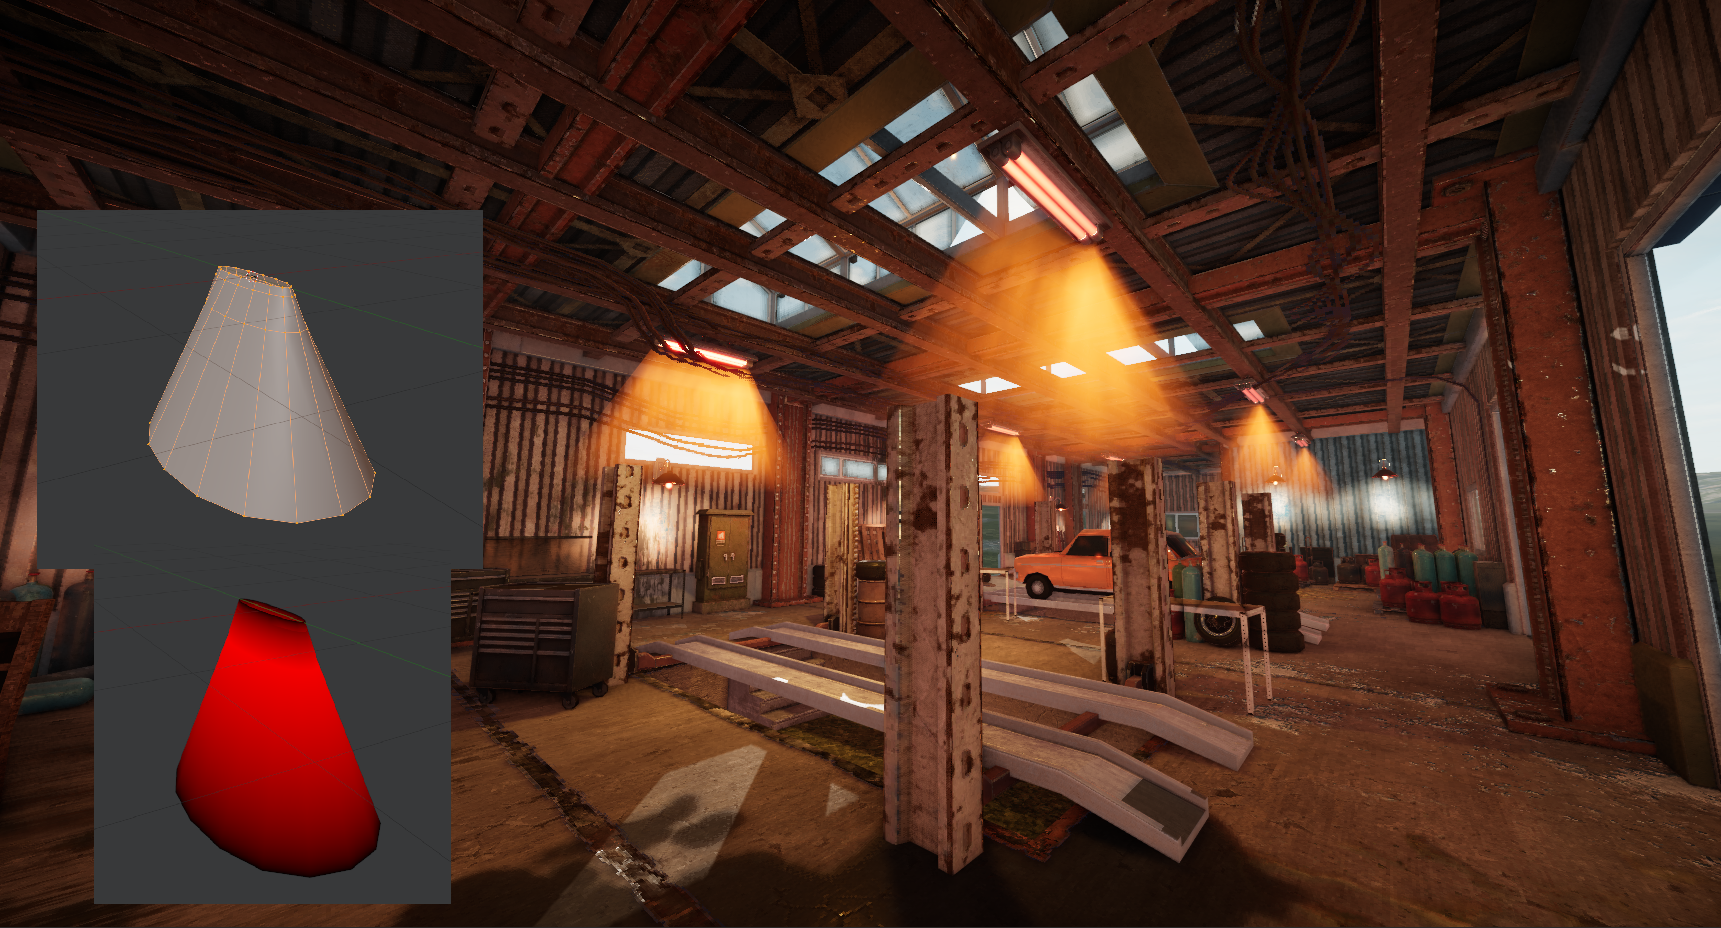
Another silly thing that I made are fake volumetric light shafts. Standard, full implementation of volumetric fog make a pretty solid impact on performance, so I decided to emulate some visuals from it instead. It is a primitive cone mesh with a special shader. This mesh has vertex painting, where red channel affects the opacity of this “light”. If red channel on current vertex is at 1 (max), then “light” is fully visible. If it is 0 (min), then it goes invisible.
To make it interact with the environment more naturally, it also uses depth intersection to make the mesh slowly fade as it gets closer to any surface. In most cases it works quite well.
To make props more detailed depending on the location’s environment, I have added several special features to our primary shader, most of them are designed to make blending several materials as flexible as possible. First feature is “procedural” blending - in the material editor, you set up second layer, and then configure how exactly it is applied. This is done at runtime, so your option is using a mask, or using world-space normals as a mask.
Using normals is a pretty cool way to blend materials! For example, if you always want to render moss at the top of a barrel, you just set Y axis to +1. This way, no matter how this prop is rotated on scene, this moss always appears on top. If you want to it render at the bottom, you just set Y axis to -1.
This method can allow you to set up blending at specific angles too, you are not restricted to use just one axis for this. And the best part about it? Math behind this feature is very simple! You always get world-space normals before finalizing a pixel, so remaining math behind blending (which is essentially just getting a dot product) is very quick and compact.
In other circumstances, I’d have to make a separate mesh with vertex painting just to set up blending, or use a mask, which has its limits too. With blending using normals, I can use same prop many times without making it appear repetitive on the scene. Isn’t that cool?
Other big thing is the terrain blending. s&box does not have any API to sample terrain textures out of the box, so I ripped out the code from terrain shader, slightly cleaned it up, and turned it into a simple HLSL class which I can access from any shader. Additionally, I make sure to blend height maps of each terrain texture, so you can use it as a blend mask too, instead of just relying on linear gradients.
This lets me blend any props with zero effort. You can use a mask, or just blend them based on terrain height difference. Both solutions work very well and allow to seamlessly mix props with terrain ground.
To make blending even more natural, it supports vertex blending as well. They get closer to the ground depending on the configuration, which makes them look nicer in some scenarios. It supports extrusion too! This means that vertices get moved sideways, as if they’re slowly melting as they get closer to the terrain. Here’s a horrible example using the guy model:
Making this stuff was fun, and I learned quite a lot from this. It is far from perfect, and admitedly the codebase is quite shit at the moment, which will take some time to figure out at a later point in development, but overall it is incredibly valuable experience for myself, and as an artist it feels great to have so much control over how your props look like in-game. I love shaders!
When you're working on a big map, you will inevitably need some tools to finish some tasks. One of them were adding roads to the map. Doing this by hand would be awfully long, if not impossible. So I've made a tool that uses Lolleko's spline library.This tool automatically samples whole spline every N units, and then pushes them as a structured buffer to a compute shader. This shader iterates through collected samples and reconstructs the spline as an actual ribbon, that can be used for displacing the terrain heightmap. It allows customizing width, falloff distance, height offset, and if you want to automatically paint terrain textures too, you can do it through this tool as well. To make painted textures appear more natural, it allows adjusting procedural width jitter.
Second tool is prop generator. It was done to automatically place props along the spline. I am using it to automatically spawn street light poles along roads, but it may be used for other situations too. They are automatically aligned along the spline’s tangent, but you still can adjust position offset, scale and rotation. These transforms can be randomized too, if necessary.
There will be probably more tools in the future as the map grows and we add more features. I am not a programmer so most of these tools are pretty janky, but hey, at least they work. :-)
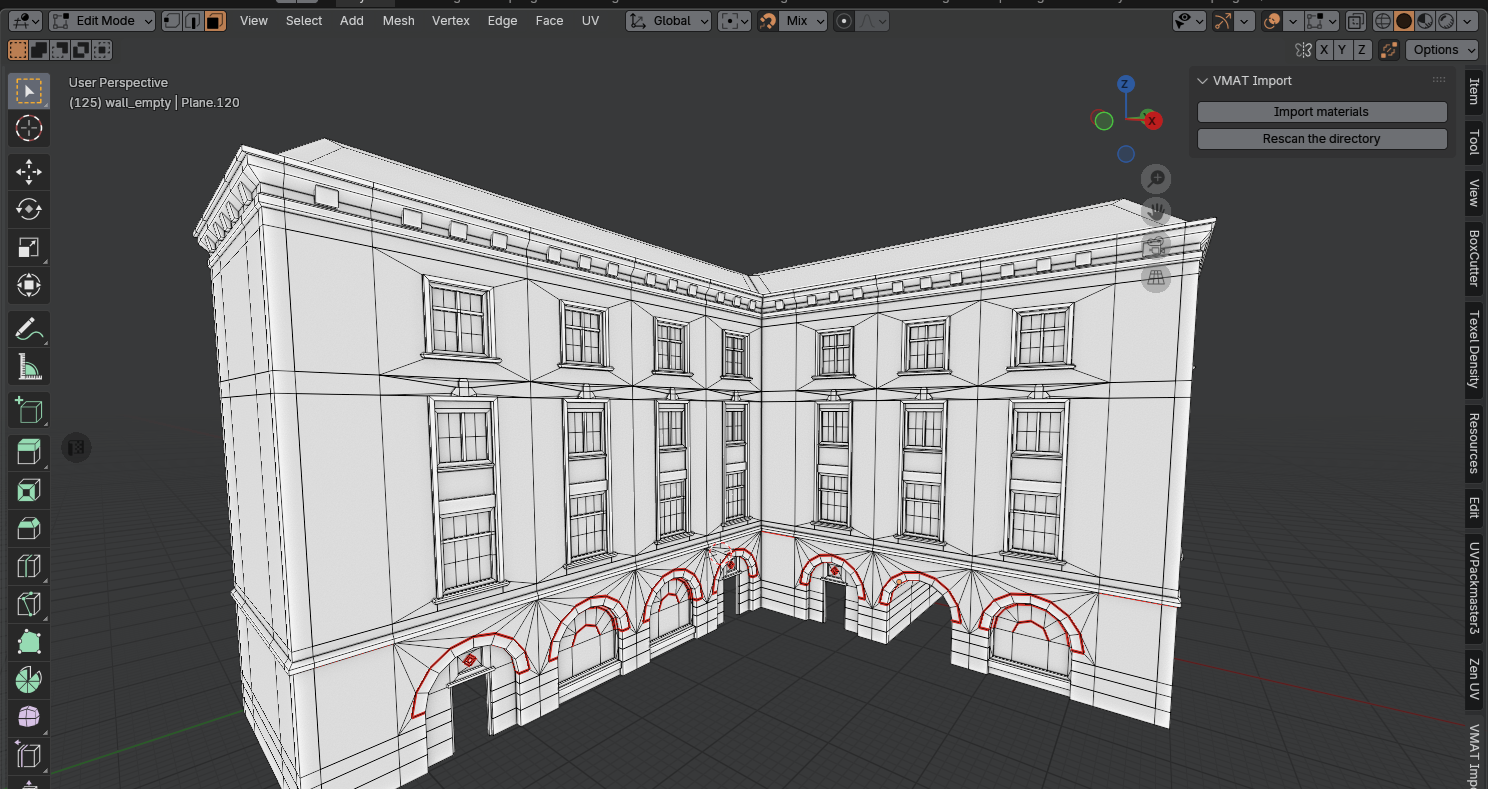
I guess it is worth to talk about my current workflow. Back when we were working on gamejam version, I was using Hammer for the entire map. Terrain was a horribly hacked giant mesh, converted into a Hammer mesh using its tools. All commercial and residential buildings were built and textured with Hammer, too.
But this time I am no longer using Hammer by any means. This time everything is done on a big scene that relies on s&box terrain system. Making it work with Hammer sounded like a terrible experience, so I decided that it is time to move all of my work to Blender. All buildings, all other maps structures, are going to be made as separate meshes, and then imported into the game. I’ve never done this in Blender before, so there was a solid learning curve!
Obviously, there are some nice Hammer features like hotspot mapping, and grid system, which are missing in Blender. Luckily, I was able to find DreamUV that replaced the hotspot mapping perfectly, and for the grids, it was easy to configure Blender to use the same units as s&box does. To adjust grid size like in Hammer, (by pressing +/- keys) I wrote a very small and simple addon that adds appopriate keybinds, and a little screen that shows current grid size.
Another big question was importing materials. Adding them by hand sounds stupid and redundant, and if you do that, you’re forced to manually set up textures in ModelDoc. Horrible! So I’ve made a simple plugin that goes through all .vmat files in your materials folder, and imports them into your scene. When importing models into ModelDoc, it can try automatically assigning all materials, so you don’t have to manually pick them by hand.
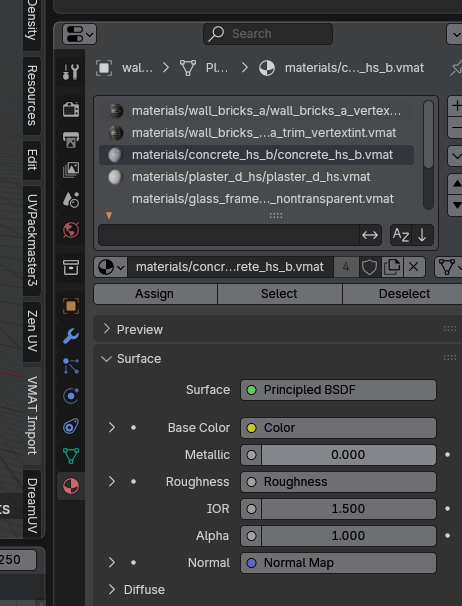
So, when these materials are imported, their name is actually their relative path to the .vmat file! When this mesh exported, these names are saved, and ModelDoc automatically assigns appropriate materials. You can’t believe how much time I was able to save this way. Unused materials are removed when the scene is closed, so you don’t have to worry about inflating your project size.
You’re probably wondering, was it worth it? Hammer was a good tool, after all. Yeah, it was worth it. Blender takes more time to get used to it, but it works excellently as a mapping tool, and you get a bunch of great benefits by having more control over your mesh. You can set up LODs, do more cool tricks with vertex painting, and set up custom collider meshes, which is very important for optimizing. UV tools are somewhat more flexible, too. You would never be able to do this with Hammer. Blender is a great choice if you’re making a big map, and I don’t miss Valve tools really.
Another big thing that takes a lot of times are materials. This is what I use to texture all buildings on the map! I do new materials whenever I feel like I am missing some specific texture while creating a new in-game location. So far, I don't have an exact number but I am pretty sure I have made over 130+ PBR materials for this game alone.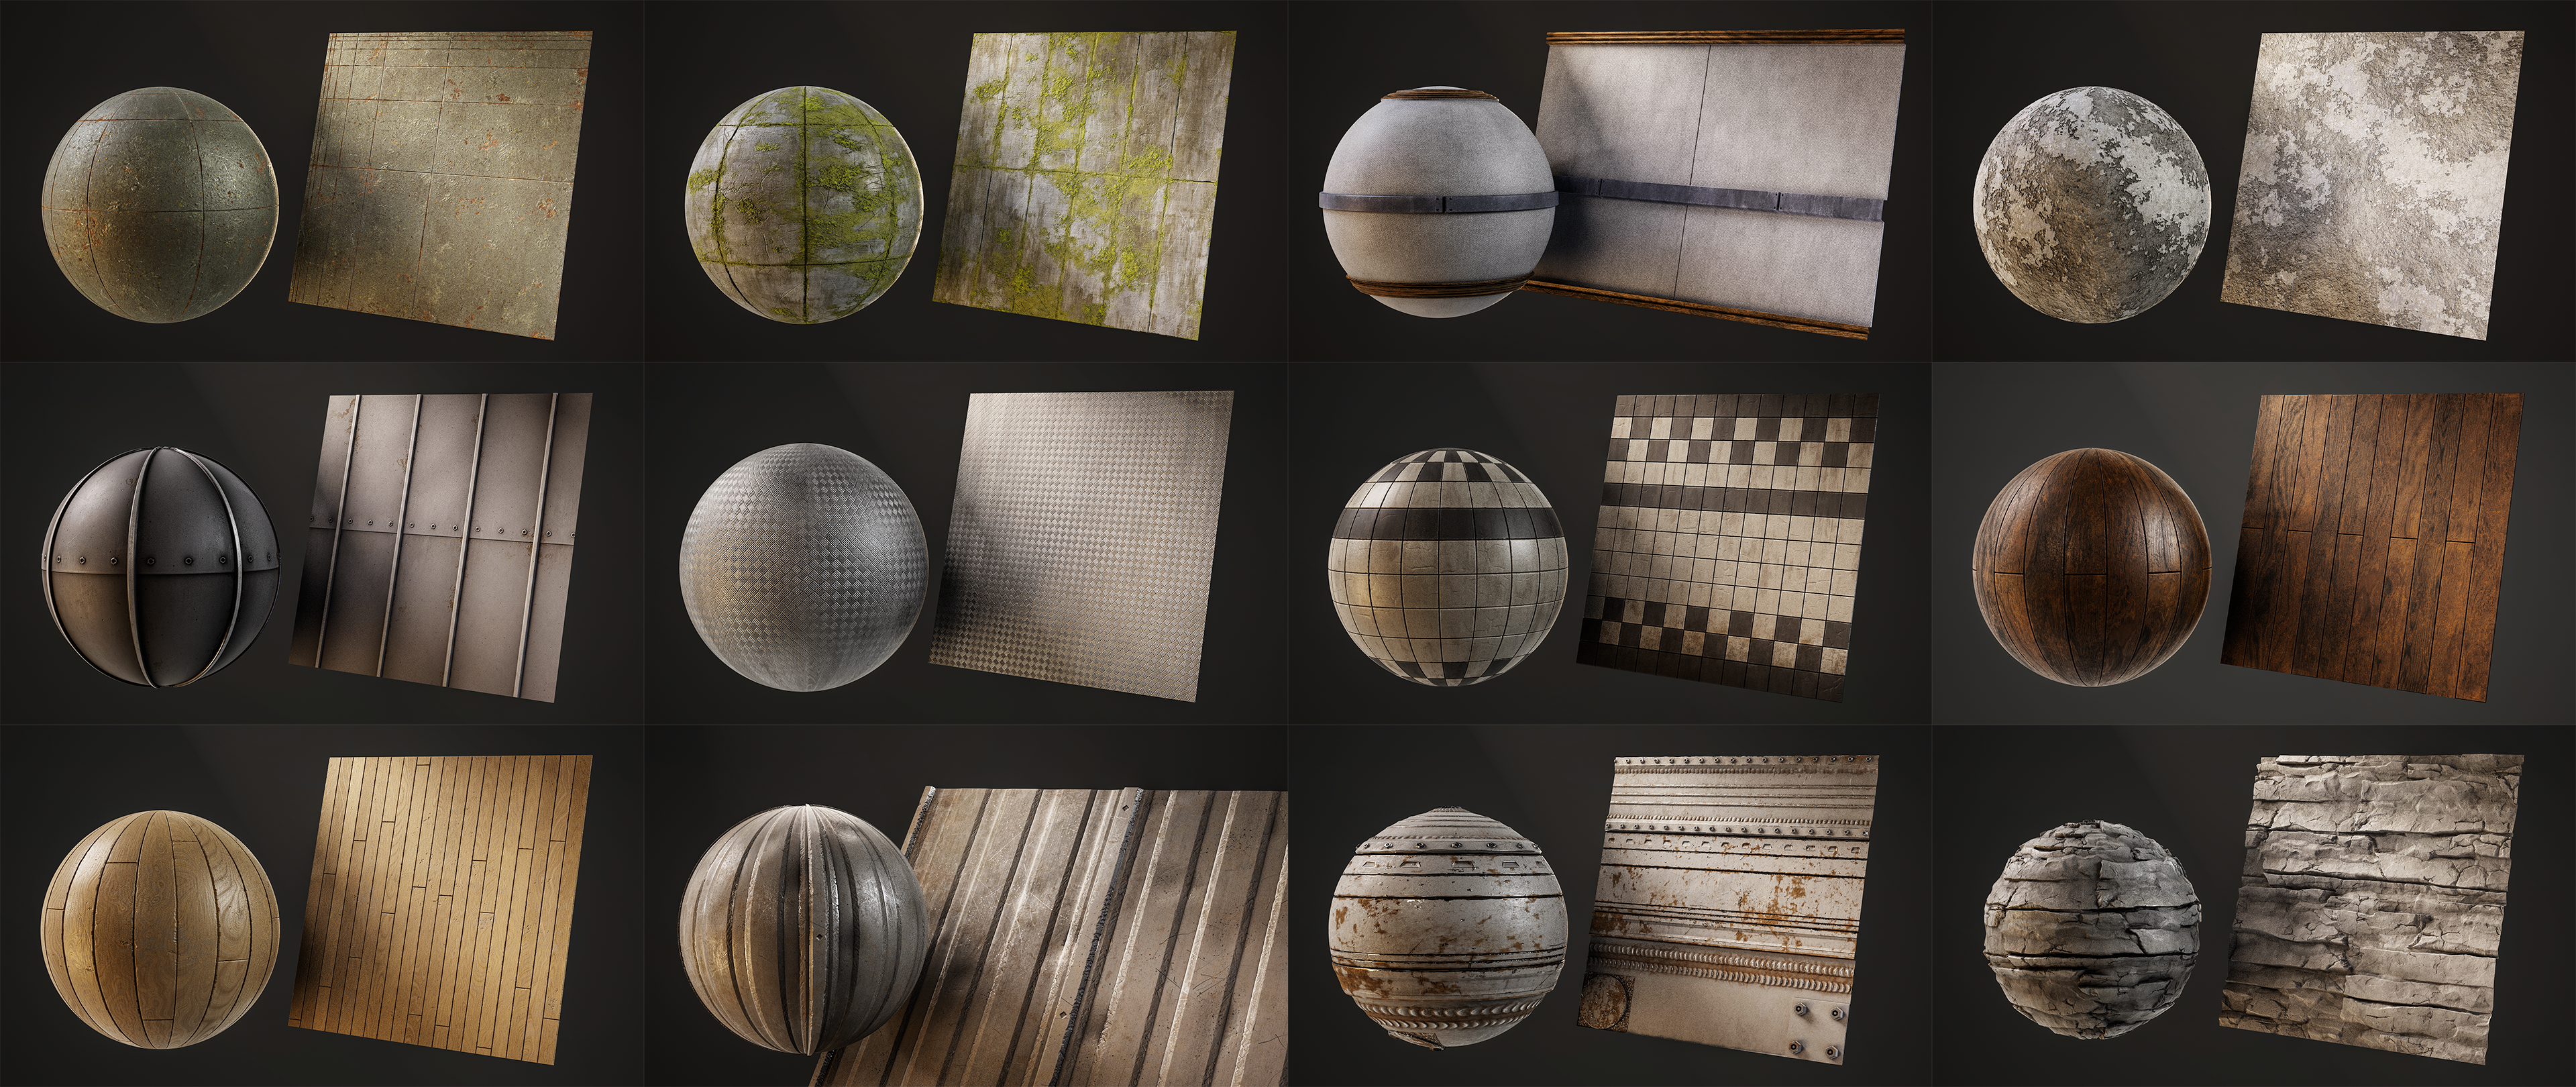
I said this back when gamejam MSC version came out, but let me remind you that all textures are designed as traditional roughness/metal PBR materials in 2K resolution. When they’re done, I am crunching and indexing them into textures that you see in-game. However, I still keep the original textures, and original project files… so if I ever decide to make them public, they will be ready to use out of the box. ;-)
Making textures in Substance Designer is an oddly relaxing process… I truly enjoy working on stuff like this. I have only showed a tiny fraction of all textures I’ve made, sometime in the future I will dump more proper renders on my ArtStation!
So, let me try summarizing everything I said... It's been going well. Lots of effort went into preproduction, planning things and making prototypes for world assets. Since I also take care of graphics, it meant that I often had to sidetrack myself to fix issues, or implement necessary features before I can continue. (that happened often, because I needed to test how our materials and props work with all of my setup!)Most of these major points have been solved, or at least they no longer hold off the process, and I have everything I need to finalize all content I planned for the demo version. Remaining amount of work is still large, but this is also the most fun part of map design! I can’t wait to start revealing more locations and other things from our game, because I think this is my best s&box work so far.
Most of the stuff I showed off in this blog feels undercooked at the moment, so please give me more time to finish up all this stuff and make it look exactly how I imagined it from the start. Things take time, and I’m still learning. It will be imperfect, but I will keep grinding until it looks good enough. Thank you!
Navigation
by ubre
With Facepunch’s newest navigation system we want to pull out all the stops and optimize for as many NPCs in your screen as possible, which is why we opted to use the default NavAgents and their awesome crowd simulation, it just needed some minor work so we could use our own character controller.
Another awesome recent addition is NavAreas, which can define how the NPCs pathfinding behaves inside of them. We made a tool to generate these NavAreas around splines so that we can tell people to stay off the road, or else they’ll get run over. You can also define crosswalks and sidewalks, removing the need to manually place 300,000 waypoints around the map!
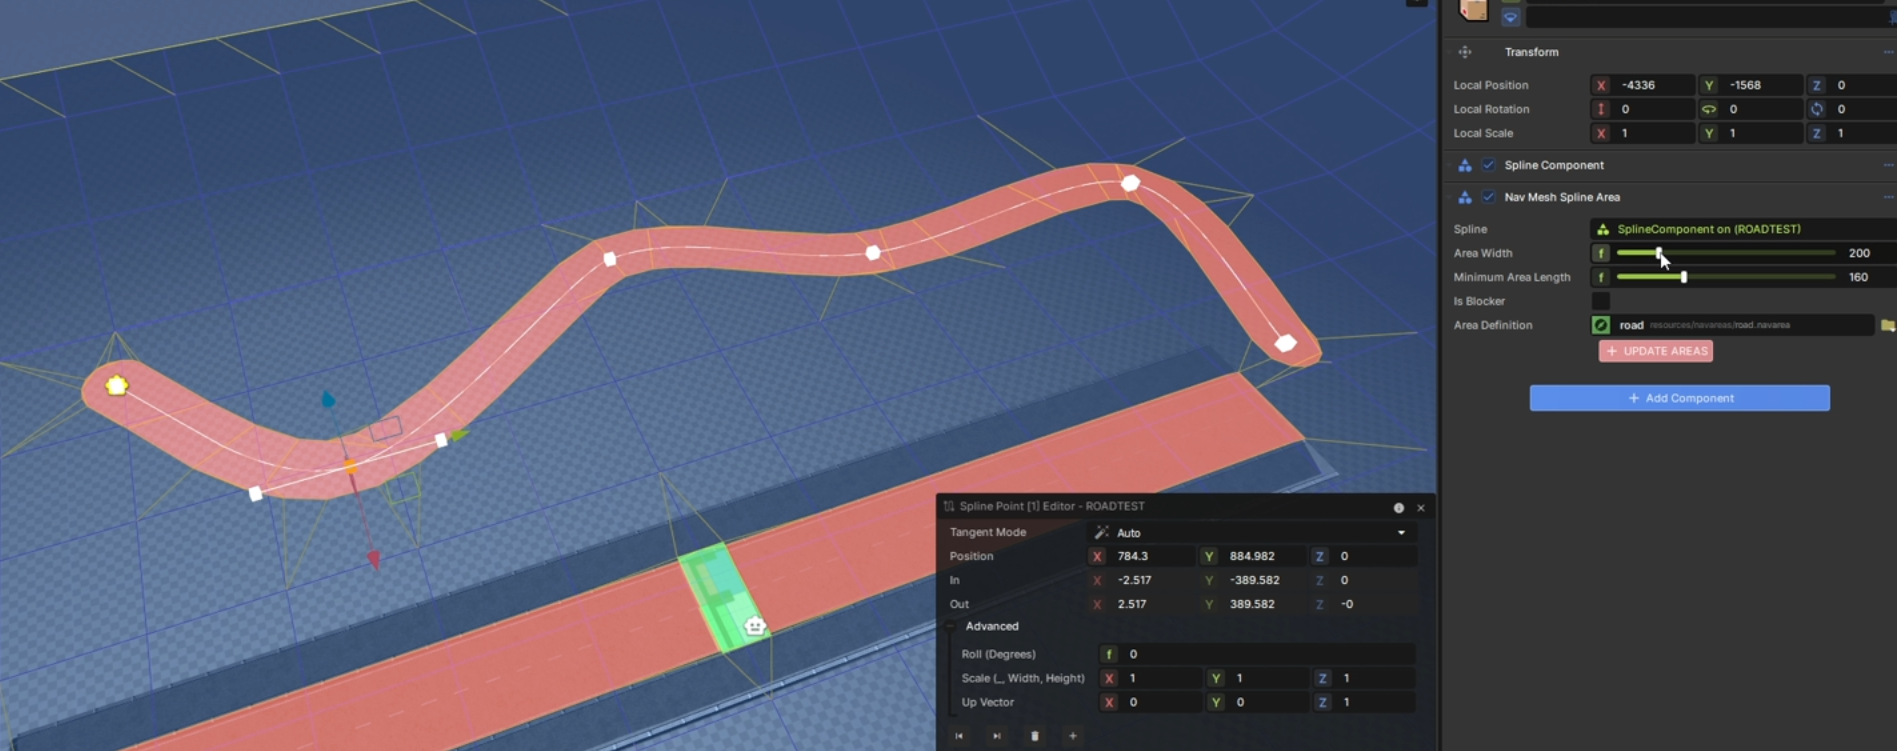
Spline NavArea tool automatically places down the optimal amount of NavAreas along a road
There are many reasons we opted not to use the default ModelPhysics, but the biggest ones were customizability and performance, which we desperately needed.
This was a no brainer, if we want you to smash beer bottles on people’s head then we need proper body collisions, and we couldn’t go with a static model otherwise objects like cars would fly off as soon as you touched them. We need the world to react to the player’s touch, for you to stumble and fall when drunk, for fish to flop around when caught, so we did all that and much more, then made it public.
Check it out! https://github.com/Small-Fish-Dev/Shrimple-Ragdolls
You can easily expand on it by defining your own modes, and it’s done per-body so you can have your legs frozen, your arms floppings around, and your head ragdolled all at the same time!
Physics LOD
by ubre
From nearby you get the full experience, simulated bodies that you can play around with. After a couple of meters they’re switched to passive bodies which sync with the animations but still allow for collisions.
Once you’re far enough that it’s hard to see details, the collisions get simplified to just a sphere for the head and a box for the body. We can’t outright disable the collisions since we still want to see them getting run over by a car or gored by a moose from a safe distance.
The game needed more progress-based mechanics, and we already had a collection log. It was my time to shine, who doesn’t like collecting bugs in video games?
I set myself the following critera… 1. Make as much variety as possible, and 2. Have as many on the screen as possible. For the first, I made a list of all the visually distinct families of insects, making sure to include every order, all the insects that were too small were discarded, the smallest being flies, since we gotta have flies for important tasks such as showing something is stinky.
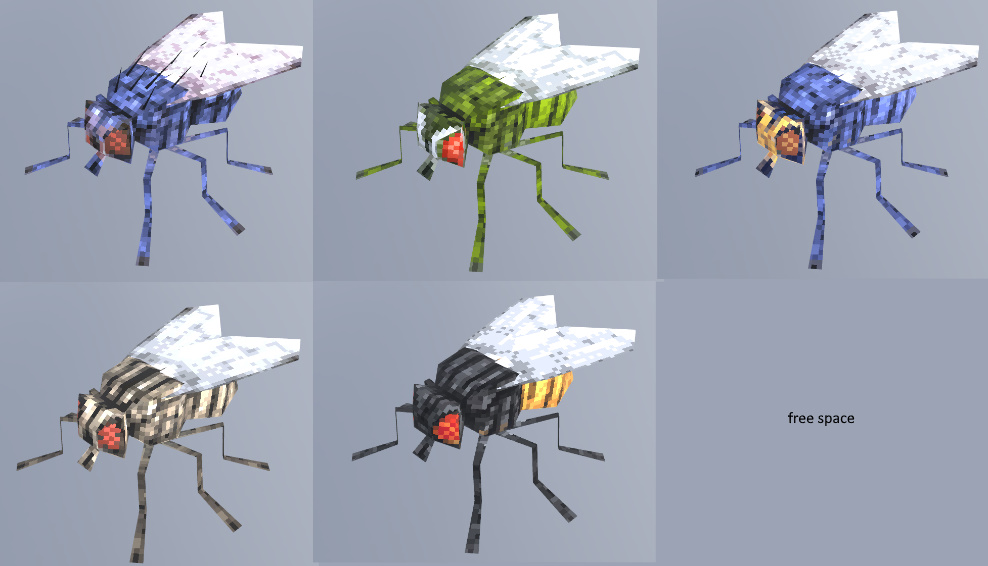
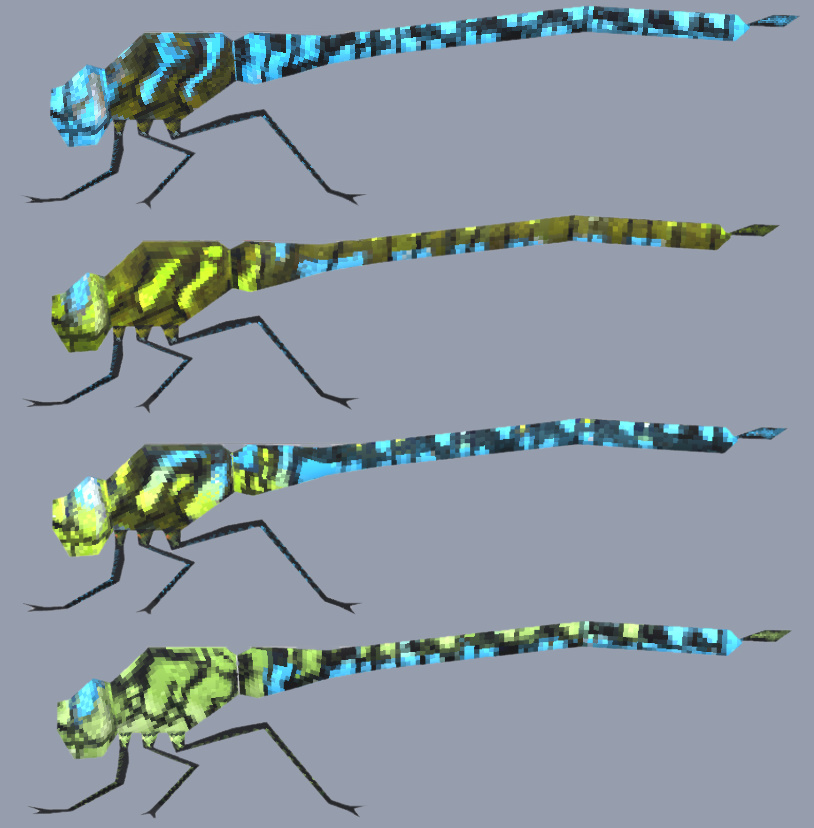
As you can see from the flies, they use the same mesh but with a different texture, once the model and initial textures are done, it is very easy to make variations, especially with non-destructive paint layers. However, I didn’t want to end up with “Red Fly, Green Fly, Blue Fly”, so I based myself on real species and purposefully chose the most distinct from Finland. Even a humble cockroach can present some beautiful diversity, although a little exaggerated, brighter and more saturated colours so the player can better tell them apart.

Insects that unfold their wings to fly also have a different bodygroups
I wanted swarms of insects attacking people, so next step was to optimize, which meant a couple of things: as low-poly as possible, smallest texture resolution, as few bones, and transparent wings are a no-go. Transparency in games is weird, and as I found out, laggy, so I had to keep the wings as all one opaque face… The low-poly part was easier, but it was painful to texture visually complex species like dragonflies, so I cheated and just excused it with “bigger species get more resolution”.
What is the least amount of bones I need to use for an animal that has 6 legs, each with more than 8 joints, 4 wings, and 3 body parts? The answer is 0! The animations are all done with shape keys, one Neutral Morph, followed by an “Up” morph, back to neutral, then a “Down” morph, loop through these and you won’t need any bone, same logic applies with walking.
The old animations sucked, they were stiff, and I had become much better, but the sheer amount of old animations to remake, and new ones to still make made me consider another option: Mocap.
I ended up choosing video capture instead of suit capture, first because, despite receiving funding, even the cheapest suit options were already in the range of $4,000 to $8,000, which was just too much for something I wasn’t sure I would use that much, secondly because video capture was more flexible, not only could I mocap my acting without having to wear a suit, but also mocap videos from the internet, useful for stuff I couldn’t act like complex dances or athletic movements (I busted my ass off trying to record a backwards running animation, I’m not doing a backflip).
Given these criteria, I ended up choosing Autodesk’s FlowStudio (Previously Wonder Dynamics), as it gave the best results with a one camera setup, setting it up took an embarassing amount of time, and in the end, I think I spent more time correcting the animation than how much I would’ve doing them by hand, but I got better and faster and it’s going to save me a lot of time in the long run.
Plus, it also has a live action feature so I can do videos like these:
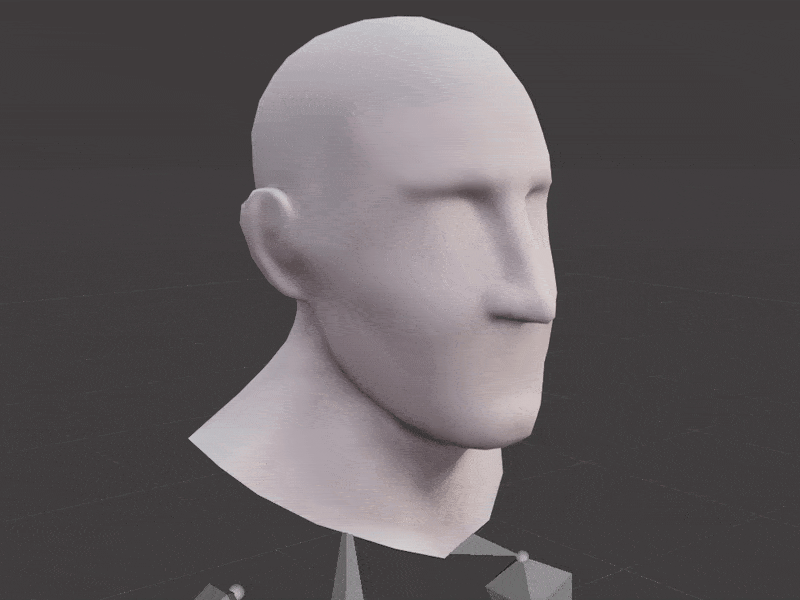
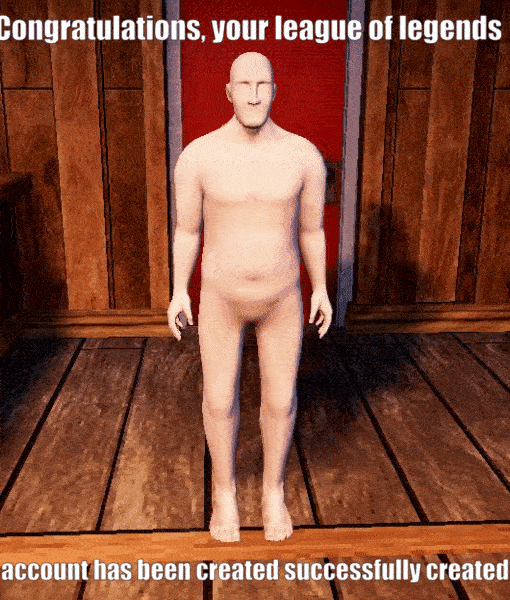
The old humans were overly low-poly, even for the style at the time, and leading up to getting the game greenlit, I was learning anatomy and sculpting, so I was eager to put what I learned to the test, but nothing could have prepared me for sculpting realistic hands for the first time, which was another big pain point for the human, as the first person view really highlights them.
You'll never see it uncensored in-game anyways
Another big pain point was the face, as the team really wanted to give our humans a customizable face. During the upscale of the character, I added a lot of details in the face geometry, both for shapekey-based customisation (Stuff like chin width or nose height), and for whatever we’ll for eyes and mouth, as I did not sculpt them in the base mesh.
Some quick tests
I did not reach the “head” part of the sculpting guide I was following, so I was not confident I could make realistic eyes and lips. Instead, I opted for semi-realistic or cartoony, which we commissioned some concept art for, and the team really liked that, so we will be going for that.
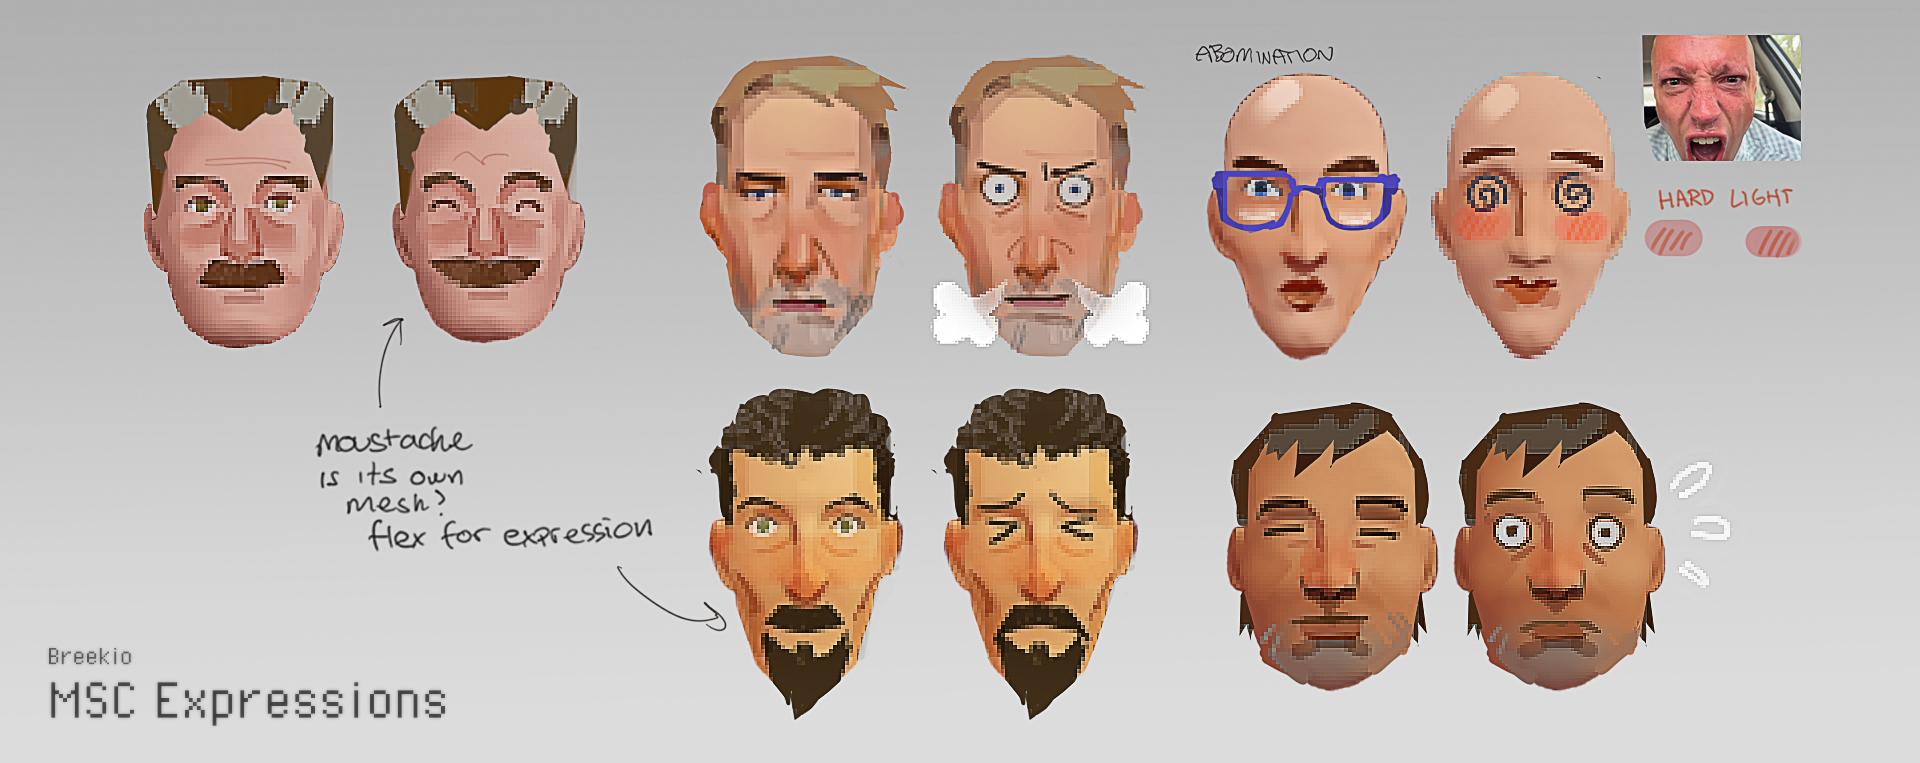
CheekiBreekio's amazing concept, one of many
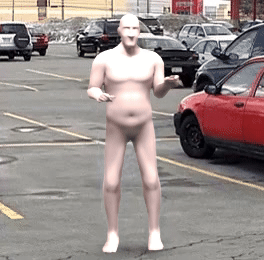
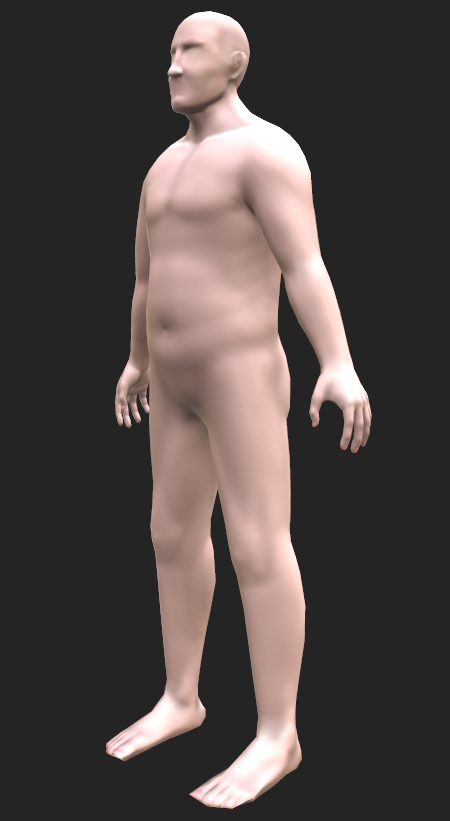
Most recently, I worked on the “fat player”; as much as I wanted to make a sphere, I was restrained by the unusually low arms during the T-pose…
In the end I made a very “pretty” fat person, with a good fat distribution, as many people that weight would have some ugly hanging fat that wouldn’t work in-game for many reasons, chief of which is that it would look bad in movement, and also make it hard to fit clothes around, which I guess are also problems in real life.
We also made it so that the textures of the skin are blended between regular and fat, so that the in-betweens feel less of an afterthought. Next up for me will also be a thin option, the thinnest of which needs to be thin enough to be used for gray aliens!
Clothing is being re-done from scratch, done “properly”.
The jam clothing was almost exclusively cheaply extruded from the base player mesh, barely altered, with no high-poly meshes — just hand-painted fake normals and textures to look like simple clothing. This caused most of the clothing to look very tight to the body and unrealistic.
The new clothing is made from scratch, using a well-sculpted, detailed high-poly clothing mesh, which is then baked down onto a custom-made low-poly, lower-resolution model and textures, allowing for more unique-looking clothing that appears accurate and baggy.
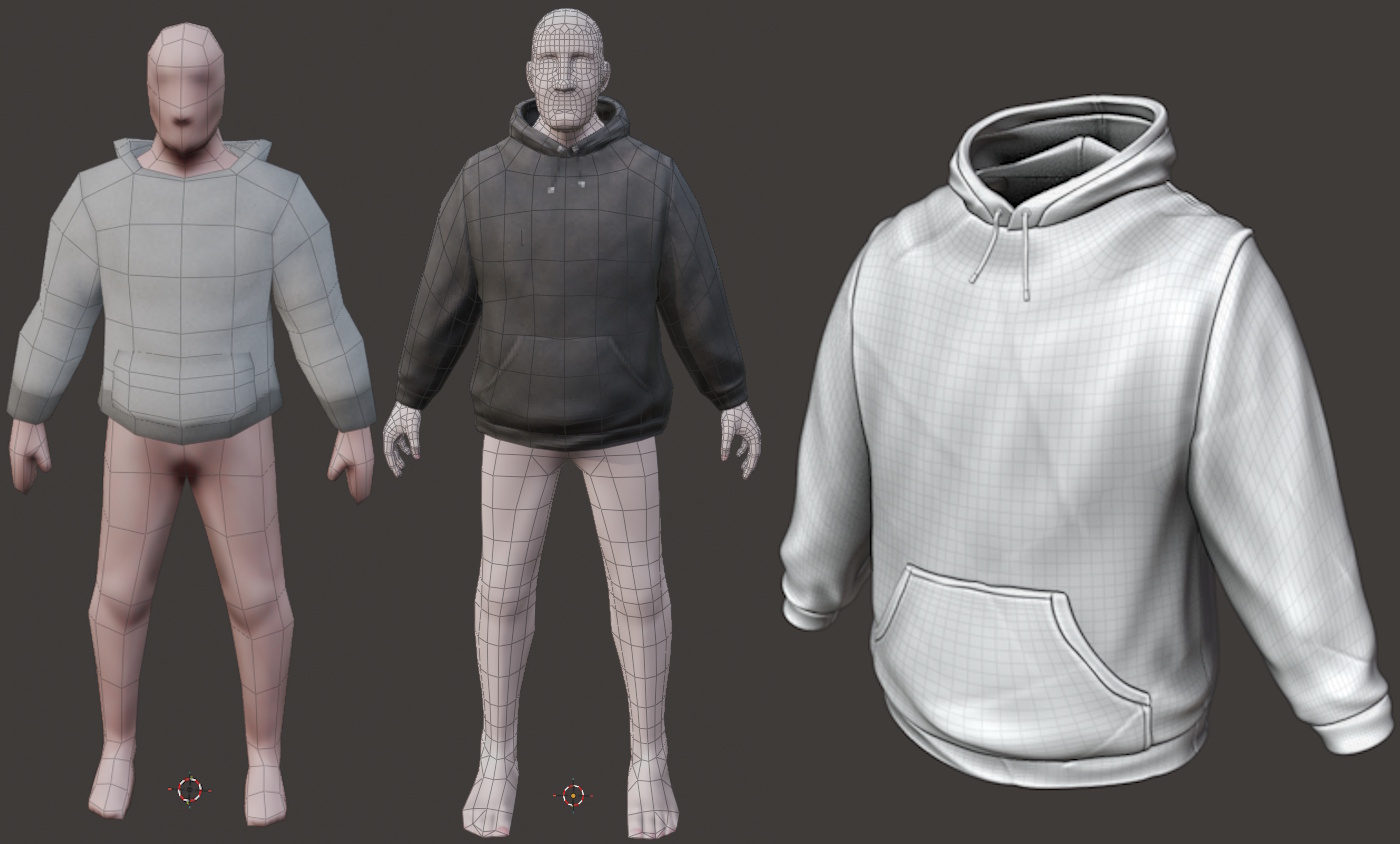
Old / New + New (sculpted base)
There are some new creatures making their way to My Summer Cottage.
We want the world to feel exciting and alive, so we have plans to add diverse fauna, including a certain lake beast.
The driving force behind a lot of the creature ideas that are planned is to maximise the amount of hilarious moments the players will have, either by themselves or with friends.
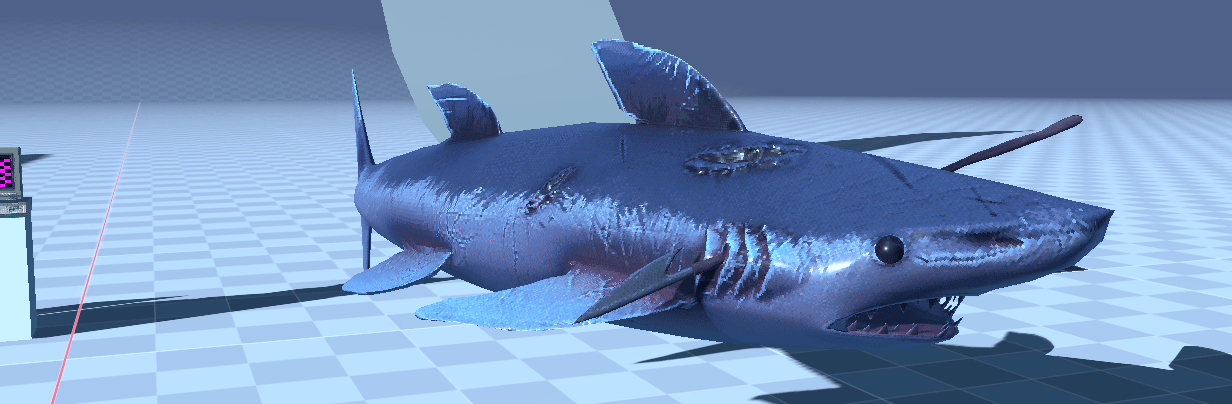
Beast of the lake
We wanted to give more depth to basic features like the player inventory, so… why not a grid-based container system? This was actually the plan with the very original MSC concept too.
I was bored one night and started making a side project that was supposed to end up as a HOMIGRAD style round-based physically simulated shooter game. I didn’t end up getting too far, but I got to write some cool systems before I gave up on the project and eventually made it open source. You can find a half-networked implementation of the container system that we use for My Summer Cottage there, the UI stuff is pretty interesting so I recommend at least checking that out.
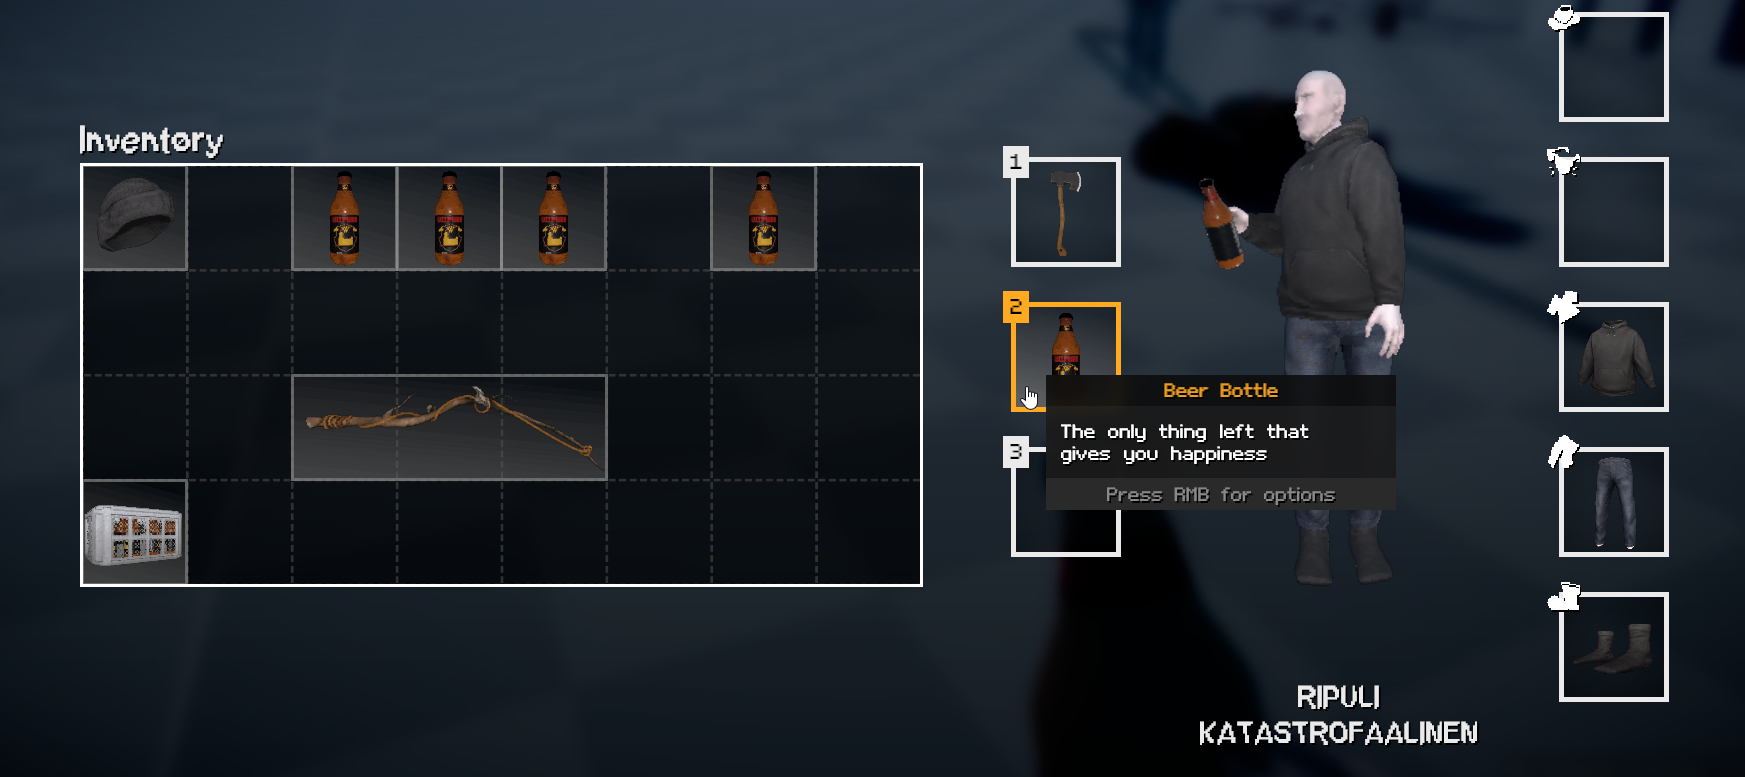
Picture of the inventory in-game.
matek ended up taking my initial implementation and adapted it so it would also work as a shop. We still plan to have in-world shops but having a UI-based shop reduces friction for players wanting to buy and sell items quickly.
Dancing Minigame
by ceitine, matek, Grodbert, wheatleymf and Mungus
This is something most of you will have seen on our social media already, the Yakuza series inspired dance minigame.
matek threw around the idea of a dancing minigame, wheatley drew up some concept art for it, some planning was done, Grodbert made some dancing animations and ceitine did most of the implementation and UI.
Heres some pictures of the concept art made by wheatley:
0: dance-1.png
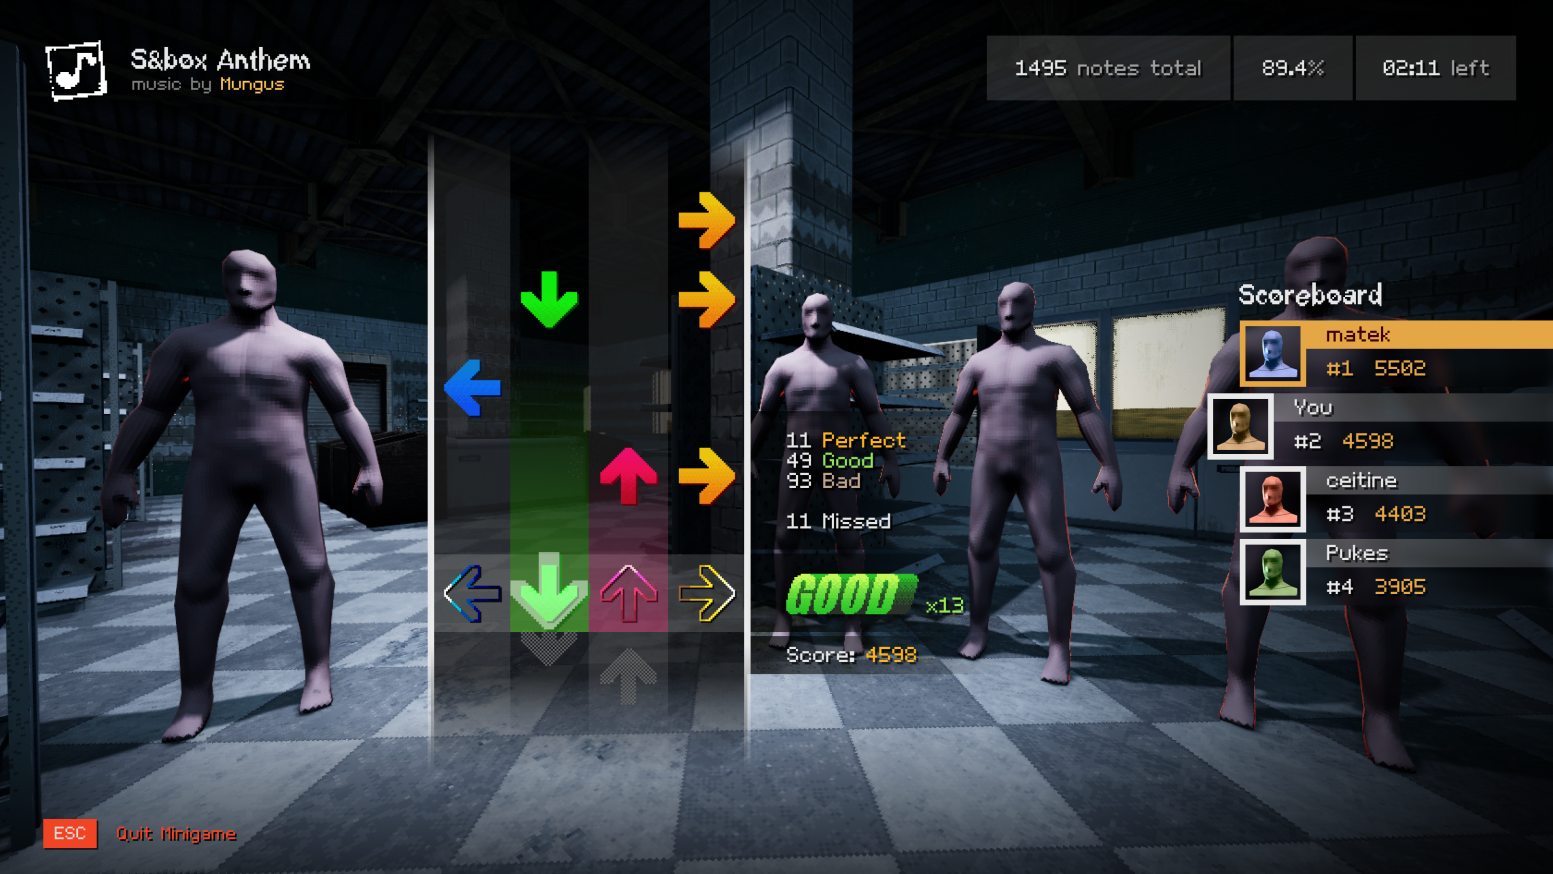
Mungus made a few fun beatmaps (using the osu!mania editor) for the future players of My Summer Cottage to enjoy. He also used his own bangin’ music that he’s made for the My Summer Cottage soundtrack.
And here is the end result from all of that teamwork!
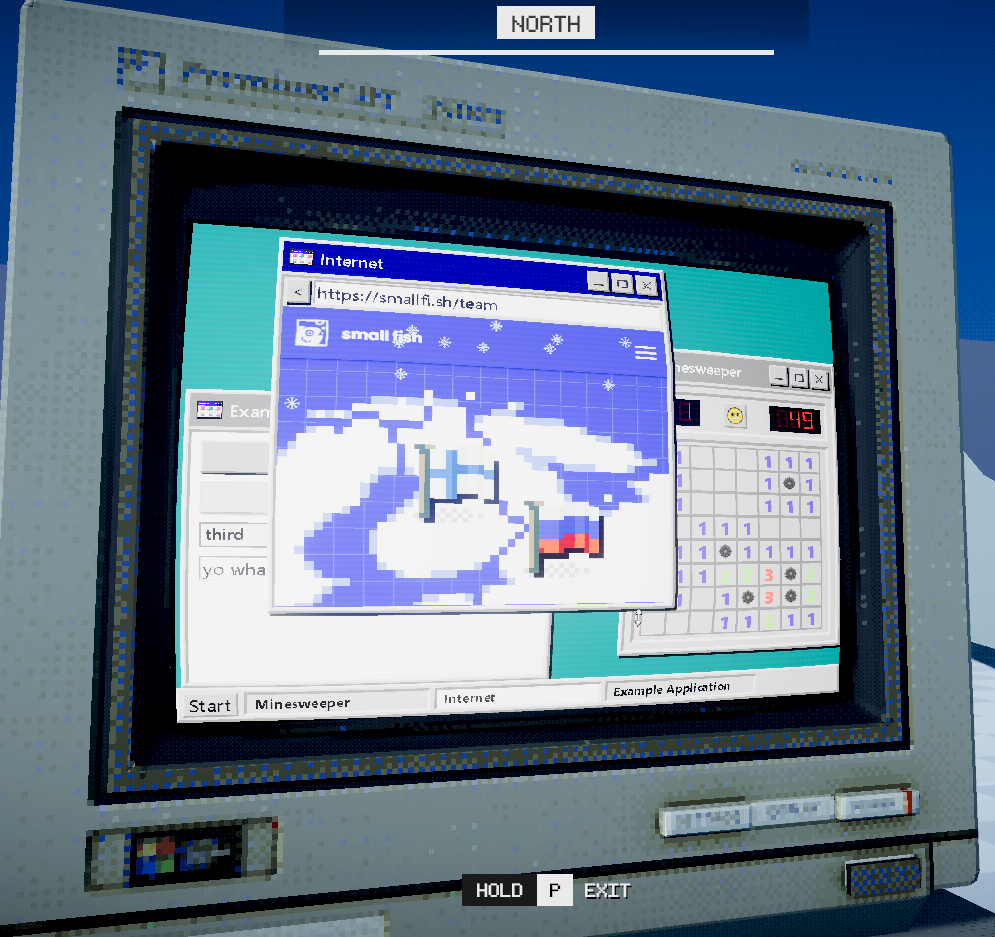
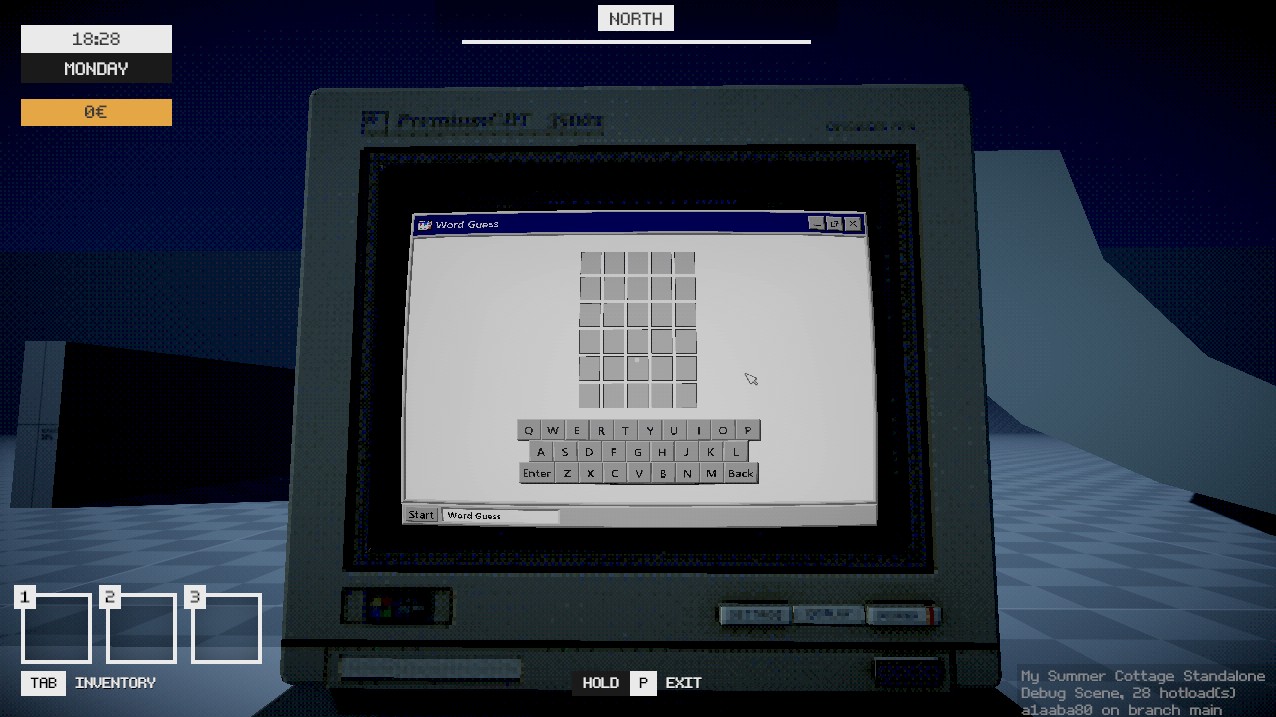
The Computer
by ceitine, matek, PUKES and wheatleymf
As the heading suggests, we added a computer. The plan is to incorporate it into your gameplay and generally be another source of entertainment.
0: computer.png
I wanted to make the computer’s API and UI easy to use so we can easily develop different kinds of applications. The example application looks something like this:
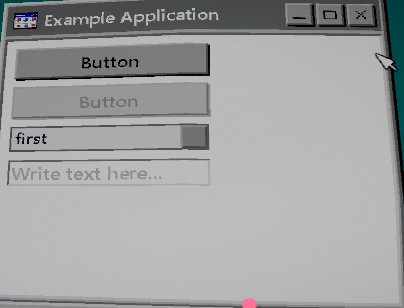
the Example Application...
@namespace MSC.Computer
@inherits Application
@attribute [ApplicationInformation(
   Name = "Example Application",
   Description = "Show off different features of our computer system!",
   Flags = WindowFlags.Resizable
         | WindowFlags.Draggable
         | WindowFlags.Maximizable
         | WindowFlags.MaximizeDefault
)]

<root>
	<FormButton Title="Button" />
	<FormButton Title="Button" Disabled=@true />
	<FormCombobox Options=@(new string[]{ "first", "second", "third", "fourth" }) />
	<FormTextEntry Ghost="Write text here..." />
</root>
matek took my API and added a web browser application that allows you to browse the internet in-game. So you can doom scroll TikToks in your favourite virtual cottage!
He even added other applications such as a legally distinct word guessing game.
We have plans to add more applications in the future, some that will hopefully tie into the world and story of My Summer Cottage.
Some of the team started as early as February 2025 working on this iteration of My Summer Cottage, so it’s exciting to see how far we’ve come this year. Once the map is mostly complete, we will be able to start putting together a demo and that is where things will really start coming together.
Thank you for reading and we hope that you enjoyed this blog.